Wednesday, May 30, 2012

PAPER DOLLS DRESS UP SERIES---episode 6

WELCOME BACK
(hope you had a great memorial weekend and a minute of silence for our fallen heroes)

today is episode #6 of the paper dolls series (PDDU)
as some of you know, we chose this oldie of a cartridge in the cricut family. pddu has a lot to offer as you can see. these are our projects to share while having fun dissecting this cart in different ways and reminding ourselves or discovering for first time most of the images in it--wink!!!

this week i am working with page #25 and decided to make a mini cards set (three in the set) using some of the images from this page.

Mini Cards Set
4" x 4" square
i used the bat, skeleton and tombstone.


the card base for all is a 4" x 8" piece of cardstock (in this case, i used bazzill), then scored at 4" and corners rounded with a corner rounder from zutter which seems to be getting dull already.
  (any suggestions i haven't tried to sharpen it again, will be greatly appreciated. i already tried the foil paper and sandpaper).
anyhow, the mme patterned paper, was cut a 1/8 of an inch smaller: 3- 7/8". 
the border is from strips of scrap paper i save in my irises containers for a "quick fix", hehe
the tombstone border is from martha stewart crafts line.

---------

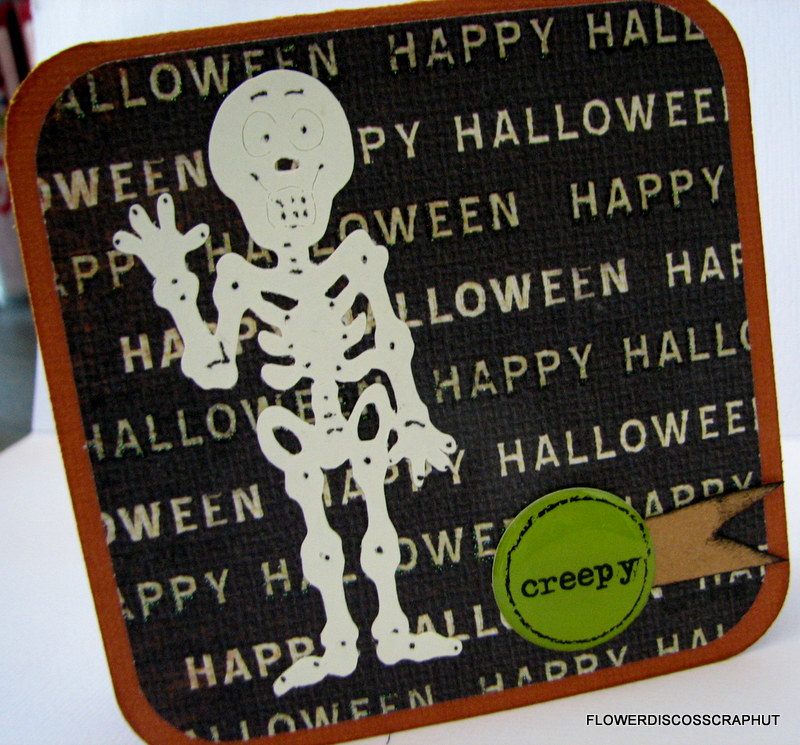
mr creepy skeleton here was cut at 2.91" but i think i could have went up to 3" high for this. the creepy embellishment was found in my "forever stash"--- hehe. the mini banner was handcut.

---------

this tombstone is my favorite.
the banner and font are from blackletter. then, using my "still working" cri-kit markers, i wrote "bones" and did the outline for the banner. it was then popped up with foam adhesive.
the "rip" and the white markings were done with a stamp and that is the look i was going for. later, i added more markings but too lazy to take more pics, :-)
the scalloped border is the negative of some paper punch i have. it was also found in the iris case i mentioned before--wink!!!

and...this is it about my project for today.    now,       we move onto my teammates work.

sheena
hehe, so cool!

kristie


dawn


nice projects, huh?
i am so happy with this series, :P

you are invited to stop by anytime and know our next episode will be posted June 6th.

hopefully, you will come back in between, :-)
see you then!!!
and, thank you for stopping by.
 i read all your sweet comments and i thank you for them too.


Saturday, May 26, 2012

MEMORIAL DAY 2012


---images found at glitter graphics---

on this Memorial Day, i invite you JOIN ME for a minute of silence in their honor.
Thanks!!! and now, have a great weekend. :P
Big Hug! 

Wednesday, May 23, 2012

PAPER DOLLS DRESS UP SERIES---episode 5

hello bloggers and friends

here we are with another mini truckload of projects from the paper dolls dress up cricut cartridge.

i hope you are enjoying it as much as we are making the projects.
they are all for fun and that is what is all about,playing with our toys---our oldie toys that is :P

here is my project for today, 
(way ahead for the season-hehe)

Beware October
3.5" x 7" tall
wall hanging/decor
i chose the cat among all the other images i had on the assigned page. i did some wet embossing with a g-studio clear stamp.
anyway, i worked with page #49 and you can find the cat on accesories 1. i made him skinnier with my gypsy and add some stickles for eyes, nose and collar.

the orange banner is a clear stamp from 7gypsies. the greenish banner was cut by hand from a strip of halloween paper which already had the word "beware". the moon and stars are from page #50 accesories 3 shift.

the thick chipboard where i mounted everything is from acm and i purchased these when they were selling thick shaped chipboard albums. i got a bunch of them to alter.

and....i am ready for halloween with this spooky decor :P

---onto my teammates projects now---


thanks you so much for being so nice and taking time of your busy schedules to visit us.
we will be back with episode 6 next wednesday, may 30st.

big hug!


Monday, May 21, 2012

A LUNCH BAG---

(ETA to change stamp company)

a while back we went to a stamp fair in the area.
i had purchased a few things including some stamps. i finally gave this one a try.
this is my project.

Make a Wish
this beautiful paper is from an old k&co collection and the two small flowers to the left are from another old pack of embellishments from making memories. the leaves i made with a martha stewart punch using a die cuts with a view glitter cardstock. the ric rac ribbon is from a local craft store and found in my stash of ribbons i hardly used, :P

the make a wish tag was handcut and stamped with a g studio sentiment, the twine is from peaches n cream found at walmart and joanne's.

i cut a piece of cardstock from the same collection as an insert.

and here is the finished project.

i stamped twice, cut it, inked edges and with a thin scor-tape went around the edge but the top. adhered both pieces together, made holes on the sides with the crop-a-dile and added the twines, buttons and tag, plus the rest of the already meantioned embellishments.
see all the details from this stamp?... you can see the creases and tiny dots shadowing certain areas.
awesome! they had on their tables all kind of stamps. the company is called: too much fun to stamp. (sorry, i had the wrong stamp company before, eta to change it to the right one) and you can google it for more info..
OH! by the way, this is a lunch bag stamp, :P

well, this is it for now :)

if you want to stop wednesday for the paper dolls series you are more than welcome :)
the projects for this week are super pretty,
and...
as always i am so glad you had time to stop by the hut.

thank you!


Wednesday, May 16, 2012

PAPER DOLLS DRESS UP SERIES---episode 4

hope you all had a great mother's day.
 we left for boston on friday morning to pick up my gift for mother's day: my son, lol

we also stopped at this mall close to our hotel and got a picture with dustin pedroia, who plays for the red sox. my hubby was in heaven since he is a big-big fan of dustin.
it was a very nice trip!!! besides the lots of packing :)

anyhow, here is our fourth episode of
paper dolls dress up
(pddu)

this is my project
a
College Bound ---file folder card
4 x 5 " tall
the pirate girl is from page #45 and it is #17 on the overlay.
(look at the hair, hehe. i used a halloween cob webs paper because i wanted to, lol).

i made some small holes with the crop-a-dile to tie/stitch the twine around.

the file tab where i stamped "college bound" was cut and outline (with a zig fine tip pen) by hand. the cute little map was majorly distressed to make it look like an old map where she found her treasure.
(her treasure was a free pass to college :P --just because this card is for one of my nieces who graduates this year).

the file folder is from graphically speaking, #32 on the overlay.
the face is from peachy keen stamps and the cardstock used from k&co and american crafts.
---this pirate has been through a lot in her short life, i can assure you life has not been easy for her---:(

now onto my dear teammates:

sheena's
is that acc2shift?
you must go to her site to read sheena's description for her beautiful and out of the box card. :)

kristie's
look at the waves, again, you have to go to her blog to read the description.
i do too because i want to know how she made them.

dawn's
and here is my pirate's mate, isn't he so handsome with that trendy mustache? or what?
loo at the ship too....awesome. you can click on dawn's name to link you to her awesome blog.

hope you are indeed enjoying the series as much as we are
and a BIG
thanks for stopping by the hut!

---bye for now---


Wednesday, May 9, 2012

PAPER DOLLS DRESS UP SERIES---episode 3

hola,
(i messed up friday night posting this unfinished post, so sorry about that)

-----------

 welcome to episode 3 of 
paper dolls dress up


i have made today just a very simple wide card for mother's day
used the accesories3 and cut it three times (because you know it is no layers on pddu). 
-----one time for the base (used hide contour on my gypsy), 
-----one time for the leaves and 
-----one time for the flowers.
 i inked all of it and pieced it together.
the border i made with a fiskars decorative scissors and added a bit of bling using stickles. i also paper pierced the blue paper for more texture.

the sentiment stamp is from g-studios.

simplicity is a beautiful thing!

now onto my sweet teammates who are working so hard to bring new ideas to you.


thanks again for stopping by the hut 
remember,
 you can view the pics in a bigger format when clicking on them and also clicking on my teammates names will take you to their blogs, where you will find lots of  "mojo" too. 
(wink-wink)

enjoy the series!

Tuesday, May 8, 2012

A MOXIE FAB CHALLENGE

i started following miss cath from moxie fab world recently, despite she has been with the paper crafts magazine for a long while now.
this is miss cath's "gingham challenge" and it ends on june 4th, and since i wanted to participate in some challenges i got brave, lol,
and this is my entry.

Hello
3.5" x 4.75"

apparently "gingham" seems to be the new trend.
i already mentioned i am not a trendy person unless i really like the trend and, gingham is to me synonym of sewing (somehow :P) and i like sewing :D so here i am following this trend with this simple card.

i did some sewing as you can see and punched the doilie border from a martha stewart punch. the yellow flowers are from another paper punch and the red centers were made with the crop-a-dile and  dotted with some diamond stickles. the "hello" is from the don juan cricut cart.

i am happy to start stretching my venues a bit.

you can click HERE to participate in this challenge or to juice up your inspiration :)

thanks for stopping by!

Monday, May 7, 2012

JUST SHARING A FEW THINGS WITH YOU

i know i haven't been too productive in the crafty world lately :P
it is one of those things where you kind of need a break i guess.

in the meantime i have been planning my little garden and doing some things around the house. i also won some giveaways and i wanted to thank the people for it. 
you know i already talked about shantaie---one of cricut designers. i won a nice little package from her and this is her blog, in case you want to see her awesome work.
and this is the nice little package i won.

i tried to participate in some challenges before and failed, lol, and now i wanted to try it again and  i  participated in the cuttlebug spot one week and won a nice cricut cover for my expression. :P

how cute and well sewn it is!
 i do not use it for my everyday expression but i put it on my cricut cake i got for pennies at cricut dot com, lol. this fab cover was made by one of my ex-teammates at the cuttlebug spot while i designed with them. her name is lillie and i belive she sells them.
this is her blog:

and, i won this beautiful die at sizzix dot com.
you know i love my sizzix too. actually, my first die cutter was a sizzix.

then, around the house, we started a little decorative fence on the front yard.


so you see why i haven't been around much, it is that time of the year where we open our windows, work in our houses and yards before the lazy summer heat comes and keep us indoors again in the comfort of the air conditioning, hehe.

well, this is it until wednesday where we return with another episode of paper dolls dress up.

see you then and thanks for stopping by.

Friday, May 4, 2012

ETA:

SORRY ABOUT THIS DELETED POST,
 it was supposed to be schedule for the paper dolls series on wednesdays and i clicked the wrong button, :(


Wednesday, May 2, 2012

PAPER DOLLS DRESS UP SERIES---episode 2

hello all

our project for today are from pages 34 (caveboy), 35 (cavegirl), 36 (raggedy boy) and page 37 (raggedy girl).

i present you now

Raggedy Girl
in a 5 x 7" frame
isn't she cute?

(you can click on the pics and get a bigger view if you want)

raggedy girl was cut at 5.50" tall.

i love the hair. i guess you can use this hair for other dolls and if you use the cricut craft room or gypsy, you can adjust it to your needs.

the eyelashes were stamped (a bit smeared and clumpy---just like in real life, lol). i hand cut the nose and hand drew the lips. the cheeks were chalked on.
the pattern on the dress was stamped too.

the socks white stripes were done by hand with a white gel pen.

the background paper is from my never ending paper supply, hehe.
the frame was a good find at ross'.

perfect doll for a girl's party theme, what do you think?

NOW, 
i proudly show you my teammates projects. you decide how much you like them. i tell you i love them all. so much work involved.
 thank you girls, than you so much for making this series one of the best.

sheena
the cutest dino ever!


kristie
made TWO projects for this week.

look at this table top, wow!

dawn
this is mr. raggedy boy, partner in crime of raggedy girl, hehe
he is so very handsome and stylish with his sailor outfit.

so, what are you thinking of this series? see how much we have in this cartridge besides the dolls themselves. so many accesories/elements we can use in conjunction with any project.

thanks for stopping by the hut!
another thing, if you link on my teammates names, it will take you to their blogs where you can see more pics on their projects and enjoy their blogs.