excuse the non- spring colors but i had the itch to use these old collection from teresa collins: far & away.
i do not know why but i am very attracted to traveling papers and stuff, especially if they are vintage looking not that this one is specifically vintage looking, lol.
let's start with
"Favorite Voyage"
is the name of my project.
(did not intend to rhyme, lol)
(the checkbook that is not, but it can be and also it can be a mini album, a gift card, money holder, photo holder, tickets, passports... and anything else you want it to be.)
i cut this one at
6-1/2" wide x 3" tall
.JPG)
anyway, i grabbed a checkbook svg from the digiplayground designed by miss samantha walker, that i have been meaning to make to keep in my purse for all the bb&b coupons and lists i have in this ugly and torn envelope that needed to be replaced like ten years ago. another mouthful, huh?
(just kidding on the 10 yrs)
the pic below shows the inside, the closure band with the flower, the old vintage wanna be antiqued cardstock, the small banner that is attached with the tiny stapler and the curly metal embellishment clip i had in my stash forever. hehe.
.JPG)
let's start with
"Favorite Voyage"
is the name of my project.
(did not intend to rhyme, lol)
(the checkbook that is not, but it can be and also it can be a mini album, a gift card, money holder, photo holder, tickets, passports... and anything else you want it to be.)
i cut this one at
6-1/2" wide x 3" tall
anyway, i grabbed a checkbook svg from the digiplayground designed by miss samantha walker, that i have been meaning to make to keep in my purse for all the bb&b coupons and lists i have in this ugly and torn envelope that needed to be replaced like ten years ago. another mouthful, huh?
(just kidding on the 10 yrs)
the pic below shows the inside, the closure band with the flower, the old vintage wanna be antiqued cardstock, the small banner that is attached with the tiny stapler and the curly metal embellishment clip i had in my stash forever. hehe.
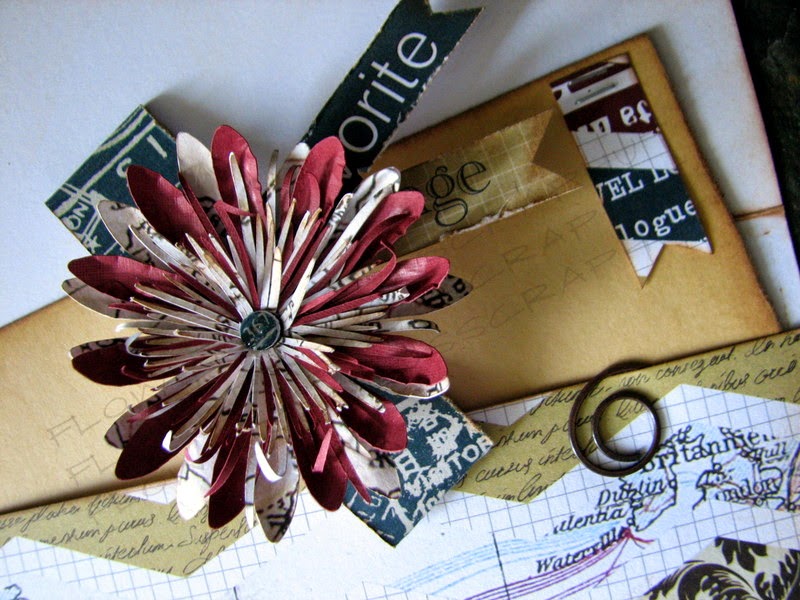
i added two more hand cut banner strips that read "favorite voyage" to add to the flower. they are also from the same tc collection.
now about the flower.
i also grabbed it at the digiplayground and is called "bractless mentzelia"
what a beautiful flower. it is supposed to look like this:


i made mine with a totally different look which i think is really pretty too.
(i bought the susan's garden flower tool kit not too long ago and i really love two of the tools and the foam mats).
i used some of susan's tools to shape miss jamie cripps bractless mentzelia svg flower below. you can also use a big ball stylus which i happened to have too from another set or anything else you have on hand to shape any paper flower and or leaves.
.JPG)
i added a bit of glossy accents to the center of the flower
(hardly noticeable but is there)
.JPG)
last pics for you to take a closer look to the edges of the petals, how they shaped,
so cute. that was done with one of the tools i liked the most from the kit.
also, a look of the front flap.
of course i inked all the cardstock edges and distressed some.
what do you think? do you like it?
both projects were really easy to make and of course i used my cricut design space software along with my cricut explore die cutting machine for the making of this project but they are available in other formats for other die cutters.
so easy to make!
hope you enjoyed my post for today and as always
thanks for stopping by.
have a great weekend!
now about the flower.
i also grabbed it at the digiplayground and is called "bractless mentzelia"
what a beautiful flower. it is supposed to look like this:
and like this in real life:
(photo courtesy of dave's garden)
i made mine with a totally different look which i think is really pretty too.
(i bought the susan's garden flower tool kit not too long ago and i really love two of the tools and the foam mats).
i used some of susan's tools to shape miss jamie cripps bractless mentzelia svg flower below. you can also use a big ball stylus which i happened to have too from another set or anything else you have on hand to shape any paper flower and or leaves.
i added a bit of glossy accents to the center of the flower
(hardly noticeable but is there)
last pics for you to take a closer look to the edges of the petals, how they shaped,
so cute. that was done with one of the tools i liked the most from the kit.
also, a look of the front flap.
of course i inked all the cardstock edges and distressed some.
what do you think? do you like it?
both projects were really easy to make and of course i used my cricut design space software along with my cricut explore die cutting machine for the making of this project but they are available in other formats for other die cutters.
so easy to make!
hope you enjoyed my post for today and as always
thanks for stopping by.
have a great weekend!
No comments:
Post a Comment
Have a fun day!!!
Note: Only a member of this blog may post a comment.