Showing posts with label PAPER PIECING. Show all posts

Wednesday, February 3, 2016

PLAYING ALONG WITH CHALLENGES

while browsing fb i saw joy clair is having its first monthly challenge
http://joyclair.typepad.com/blog/2016/02/monthly-challenge.html
and why not to join them since they are a fabulous group.

this is my submission.

I love to have you in my life
3.5" x 5.75"
the greetings on this card are from joy clair stamps: the i love is from hugs and smiles, the to have you in my life is from thank you for everything and the tiny outlined hearts are from wedding wishes. 
the girl and the mailbox is a stamp set from mft and is called pure innocence. i purchased it used from one of their designers.
the blue textured strip was done with another punch negative and some blue texture paste (already colored) and i added some wet embossing to all the hearts. the small yellow flowers are from io. i used the same ones on this halloween haunted village, they are super cute and they have come in handy more than once. the piercing was done with a thin die from paper smooches. i used that same die on this new year's day watercolor background card. 

the challenge page has been linked in case you want to play along.

take care and thanks for stopping by.


Wednesday, July 15, 2015

BUTTERFLY ON CANVAS

the inspiration for today's project comes from my own backyard.
 i have been planting perennials for 3-4 years now with birds and butterflies in mind 
and, i have plenty of birds. no problem with that. just yesterday i saw one i hadn't seen around. a kind of woodpecker called northern flicker. what a beautiful bird!
 but, i am failing attracting butterflies. this year we got a few more common butterflies showing up. i think that is a good thing, :) maybe i am not failing after all.

anyway,
the butterflies are what inspired my project and 
for today i am working with a new arrival to the store:

in this post i am also explaining how i download and save my digi playground files or any other files/images i want to save in my computer.
(a bit of pic heavy post) :D
hope it helps.

first,
My Butterfly on Canvas Project
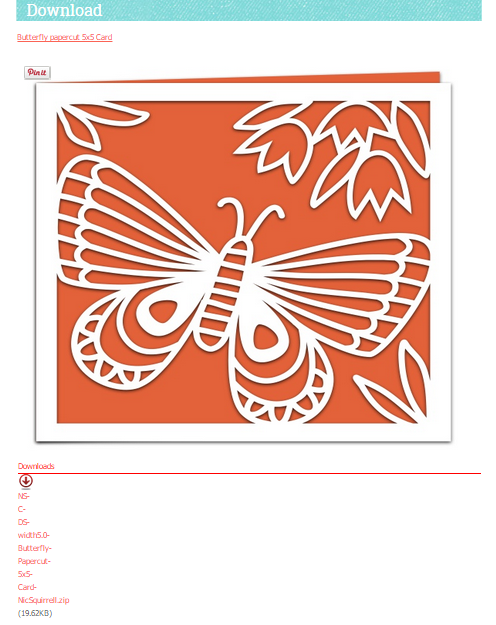
the file is for a 5 x 5 card but needless to say, i cut/sliced off the other side of the card and i kept just the butterfly part.

i used white textured cardstock for the butterfly outlines and 5 different color cardstocks for the inside: aqua, green, orange, pink and yellow.
i then used the negatives of the color cardstocks to paper piece? my butterfly.


i used the clear wink of stella to add the shimmery effect you see on the above pic.
(the background clouds paper is an oldie from dcwv)


-when done i adhered it to a mini canvas with my tape runner-
(5 x 5)
filed the edges and voila....
 "a butterfly on canvas".
hope you like it as much as i do.
it was a darling to make.


-this is nic's butterfly svg-
check it out, the pic is linked to the store.

and as always,
thanks for stopping by!

-----------------------------

now onto the tut of how i save my digital files.
remember you can click on any pics for a zoom in.
(know i have a pc not a mac, it might be/look different if you have a mac)


1- after purchasing or acquiring your file(s) you will be prompted to download:


normally, when you download images or copy and save images from the internet, it automatically defaults to a download folder in your computer. i recommend you find your default download folder prior to download just that you know where it is located (in case you do not know, that is). i also recommend adding a folder to your default download for your digital files and add a sub folder for each file you save. it makes your searches easier.


2- clicking on that red download button will take you to the page where your purchased image is:
you will see another red download button: click on it and it should automatically take you to your default download folder. (you should have added that other folder for your digis and maybe a sub folder if you wanted to---makes it all better). 


3-  if your download folder is not highlighted, you can click on it for your file to go in there and then click save. --your computer screen should look similar to the pic below. 

see that "extract files"?

click on it and that will open your files, ready to be used: (please, ignore my library, that is where i keep mine). 
the file(s) are now open (unzipped) and ready to upload to your electronic cutting program/software. 
i use cricut so i upload mine to cricut design space.

the one for cricut design space is the second one: see the DS for design space? (NS-C-DS). (i believe the first one is for any other software other than design space). some files have digital stamps, or pdf's you can print out and cut by hand. you can separate them in individual folders if you want to or just keep them all together in the same file folder. and that is that for the downloading and saving.
if i didn't explain it clearly, please, do not hesitate to contact me if you are using a pc (not mac) and i will be glad to help you step by step.
:D

----------------------

blogged by flowerdisco
from 


Wednesday, July 17, 2013

HAPPY HELLO...a your favorite color combo challenge

this week the challenge is 
"use your favorite color combo".
 i have many favorite color combos and this is one of them.

Happy Hello
is my first pillow box ever, hehe
did i mention our sweet sponsor this week was so very generous and will be giving away a $15 gift certificate to a lucky participant?
 i want to send a big thank to 
"the paper parade"
we the dt also received some goodies and
the penguin was included in the goodies. isn't he handsome? he is a kaisercraft one.
as you can see i stamped it on patterned paper.
---all the papers used are from the paper parade authentique lovely collection---
it is the same collection i used for this banner and this card i made a while ago.
the sweet happy hello banner sentiment is from this whimsical designs clear stamp set.

the pillow box is from a cricut cartridge called: Wrap it up and i used a paper punch to make the zig zag border.

don't you love him? 
i did some paper piecing on him too: hat, beak and feet. i hand cut the banner after i stamped the sentiment and popped it on foam tape.
i know you love him too.


and thanks a bunch for stopping by.


Sunday, June 23, 2013

LOCALLY GROWN...a strawberry treat box

who does not like strawberries? 
i haven't met one person who does not like them. 
i love them in smoothies, i even put a bit of hershey's chocolate syrup when making them, :P
YUMMY!

this time my strawberries come in a pdf doc from the cutting cafe and this treat box is a darling to work with.

Locally Grown
hehe
not including the handle this box measures approximately 3-1/4 inches high by 6-1/2 (from strawberry to strawberry)---but you can resize it to your liking.
you know i cut by hand, and i am just saying it again because sometimes i have to get creative.
 those tiny seeds are bigger on the file but my hands are bad so i got mine from the negative residues of one of my paper punches, hehe. so, do not let not owing a digi cutter stop you if you like these files. just have to get creative and make with what you have in your stash. wink-------

a pic from above

i attached the handle with some tiny eyelets

see the cute sentiment? i love it....i am all for locally grown, recycling, re-purposing...oh yeah!
i love the pretty flower too. 

there are so many files at the cutting cafe and they are so reasonably priced. you get a lot for your buck there. this is why i am so happy to be in the dt. i get to showcase some of the files and enjoy myself while making them. it has been a great journey so far.

also, you will find tons of inspiration for all kind of projects. 
have fun and thank you for stopping by.

---below is the info about this strawberry treat box file all linked to the cafe---


Sunday, May 12, 2013

WHAT'S BREWING MOM?...having a cup of coffee at the cutting cafe

but first of all:
Happy Mother's Day!
i should be coming back home soon from boston from getting my son back from college. 
it is my greatest gift of them all.
hope you are having a great day too!

this is my second project for 
and we were asked to use the coffee shaped card cutting file
i just did not use it as a shaped card but as a tag.
 this jar was given away as a small appreciation gift for mother's day to one of my sweet neighbors.

What's brewing?
tag
2.75 inches tall 
so super cute!
(the colors are darker than it is showing on this photo: the brown is darker and the blue is a darker baby blue)
you all know i do not own a cameo or mtc or anything like it so i cut by hand and this cup was easy to cut.

here you can see the re-purposed glass jar and the band i cut to embellish it.
the "what's brewing" sentiment and heart also come with this file. 

 here you can see the coffee beans inside the glass jar and a bit of embossing i did to that red strip.

below i linking the info to the file specific page and also added what this cute file comes with. 
i had fun working with this file. i used the pdf version of it and all the instructions to work with them are on the shop in case, like me, you are not too familiar with it. easy to use tough and if you encounter any problems along the way, regina is also just one click away.

COFFEE CUP SHAPED CARD 2 TEMPLATE - CUTTING FILE


thank you so much for stopping by!
blogged by flowerdisco 

Friday, May 3, 2013

SKETCHY FRIDAYS NEWS

hello

and a huge happy mother's day to all!

 i have some sad news:

this week we are closing down 
"Sketchy Friday".
I am so sorry to see it go but it is a decision sonia made. She knows better and she knows the Y's.

i want to thank all of you who came to my blog from Sketchy Friday. i appreciate you taking the time to come over because you liked my project using sonia's digis. 
who knows what the future holds for sketchy friday, if any. :(

thank you sonia for giving me the opportunity to enjoy your super cute images and i wish you the best my friend.

here is a card i had made for my turn next friday but since there is no more sketchy friday i am sharing it with you today. :)

sonia has these gorgeous butterflies in her shop and i chose my favorite one for today's project BECAUSE, sonia will keep her SK DIGIS store open and sonia will continue designing, you can still enjoy her designs. that is a huge plus, lol. 
we won't loose it all :)

anyway, this is my card for you today
Fluttering by to Say Hi
3.5" x 5" tall
the butterflies were cut by hand and the jar was cut using my cricut expression.

i used vellum for the jar and my spectrum noirs for the coloring.
(since my butterflies were printed at 1 inch and 3/4 inch high, i chose to cut off the antennas to make it easier to cut by hand, but they do come with the antennas)

i also added some other butterflies inside the jar along with some glitter)
i also loved all the papers i chose for this card. 
and the stamped sentiment is adorable too and i loooove that font.
i hand cut that extra bottom piece in patterned paper. i think it added so much to the jar.


SUPPLIES USED 
IN THE MAKING OF MY CARD
digital image:     SK DIGIS
patterned papers:     fact from basic grey (red) and traditions from carta bella (blue/yellow)
yellow enamel dot:     my mind's eye
vellum
cotton twine

any questions? please contact me and always remember to
click and share
for others to see pretty projects :)


thanks for stopping by and have a super beautiful MOTHER'S DAY weekend!

Monday, March 4, 2013

LONG TIME NO SEE....using digital images

i have been playing around again with these cute digital images from SKD and i made this cute card. it took me all day figuring out if i wanted colored in with markers, colored in with microsoft paint or paper pieced. that is how my day went, lol,  up in a cloud thinking and thinking.

Long Time No See
3.5" x 5"
---these colors are too soft for my liking but i had them and i wanted to try something different---


i used some mme patterned papers i had in my stash, a clear stamp sentiment, paper punches, markers,
the cricut die cutter, and some stickles for this card.

 see how cute!..i ended up paper piecing them and just colored the bows at the tails.
despite that i love the skd clouds, i thought of them after the fact and i was too tired already to go and print some out so i used the fiskars clouds punch. i fuzzy cut the kites, yes...it took me another long time, hehe.

here is the bottom half. the wood panel is from a different  mme patterned paper. the banner i cut with my cricut, just a rectangle that i made into a banner. the branches are punched out too. the sentiment from my dear friend stephanie's stamps.

as i mentioned before, not my colors but even so, i think it turned out pretty.


Supplies Used:
digital image:     sk digis (kite)
clouds:     paper punch
bracket and banner:     cricut expression
branches:     ek sucess paper punch
stickles:     (diamond)

and this is it for today...

thank you so much for stopping by


Wednesday, May 9, 2012

PAPER DOLLS DRESS UP SERIES---episode 3

hola,
(i messed up friday night posting this unfinished post, so sorry about that)

-----------

 welcome to episode 3 of 
paper dolls dress up


i have made today just a very simple wide card for mother's day
used the accesories3 and cut it three times (because you know it is no layers on pddu). 
-----one time for the base (used hide contour on my gypsy), 
-----one time for the leaves and 
-----one time for the flowers.
 i inked all of it and pieced it together.
the border i made with a fiskars decorative scissors and added a bit of bling using stickles. i also paper pierced the blue paper for more texture.

the sentiment stamp is from g-studios.

simplicity is a beautiful thing!

now onto my sweet teammates who are working so hard to bring new ideas to you.


thanks again for stopping by the hut 
remember,
 you can view the pics in a bigger format when clicking on them and also clicking on my teammates names will take you to their blogs, where you will find lots of  "mojo" too. 
(wink-wink)

enjoy the series!

Wednesday, April 18, 2012

PAPER DOLLS DRESS UP---is opening with a spring theme tag

---as planned and on time---
here is my tag

(i am changing my style a bit for this series, i want it to be clean and simple)


Little Lamb
2.55"w x 2.80"h
the lamb you will find on page #77 (accesories 3) and the oval is from page #69 (accesories 3).
the oval was cut at 3.15"w x 3.60"h.

---i normally use my gypsy and that is why my sizes are a bit weird but you can round them if you do not own the gypsy or you can use the cricut craft room for all your cricut projects, planning and cutting.---


i  also did some hand stitching which seems to be so trendy right now.

 ---i am not a trendy person unless i really like the style, hehe---


------------------------

now onto my teammates work

---you can click on their names to got to their blogs---
and, you can click on any pics for a bigger view.
thanks!

the following tag is from:
 sheena


this one is from:
 kristie


and this one is from:
 dawn


--------

 hope you enjoy this series where will be dissecting the 

Paper Dolls Dress Up
cricut cartridge.


the four of us were assigned different images to work with and
we will be uploading every wednesday until we finish the cart.


you can play along if you want too, and it would be nice if you link back to us.


Thanks again for the opportunity to share our work with you and a bigger thank you for stopping by the scrap hut.