Showing posts with label WALL ART. Show all posts

Thursday, September 10, 2015

CRAYOLA WATERCOLOR HALLOWEEN BACKGROUND

hi all,

not saying much today but letting you see what i did with some crayola watercolors, some strathmore watercolor paper, some paper smooches stitch dies and a spellbinder cat die.

A Halloween Wall Art
4 x 6
how do you like the cats furs?
super cool, huh?

-you saw them here first-
hehe
(have to mention it because some have been even stealing my flowerdisco name.
can you believe the nerves of some???
grrr!)


the orange on the right is supposed to be a water-colored halloween moon.
the bats were stamped from a g-studio clear stamp.

the fright night is from a fiskars clear stamp set.


here you can see different options i had in mind for my cats.


-these are the supplies used-

for your enjoyment and inspiration only.

blogged
by
flowerdisco
from
flowerdiscos scrap hut

Thursday, June 26, 2014

NO WINGS...

hello all,

not too long ago i was the lucky winner of a beautiful cling stamp set from the 
Paper Wings Production.

i finally had time to play with the stamp, here is my project:

No Wings...
-this is the sentiment i used-
(hence the name of my sign/project)


a bit about this project:
the wood patterned paper is from 7 dots studio. it is from the same
  nature walk collection i used for my mini.

i covered some shaped chipboard with this "musical blooms" paper and inked and roughed the edges of it. i also used some walnut ink from tsukineko to make the blotches you see near the bird.

i stamped the bird using some colorbox mix'd media black ink because i wanted a soft look.

for the sentiment i used ranger archival ink because for this i wanted a crisp look.

these birds on a branch are also from the the same stamp set i won: Bird Beauty.
i embossed them with lindseys embossing powders: midnight copper and tannerbaum green gold.

the dripping you see covered with the midnight copper embossing powder was stamped using a recollection stamp set called: splat.
some jute and some black wire makes my project a mini hanging sign.

 this is the stamp set i chose.
the sentiments are so encouraging and the images so pretty.


well, and this is it for today.

hope you enjoyed my project. 
i wanted to share with you the pretty stamp.

i am adding it to the aviary for this month's challenge. it ends tomorrow the 27th at 11pm cst...i am running late. :D

have a great week and a better 4th of july.

thanks for stopping by flowerdisco's scrap hut.


Wednesday, May 8, 2013

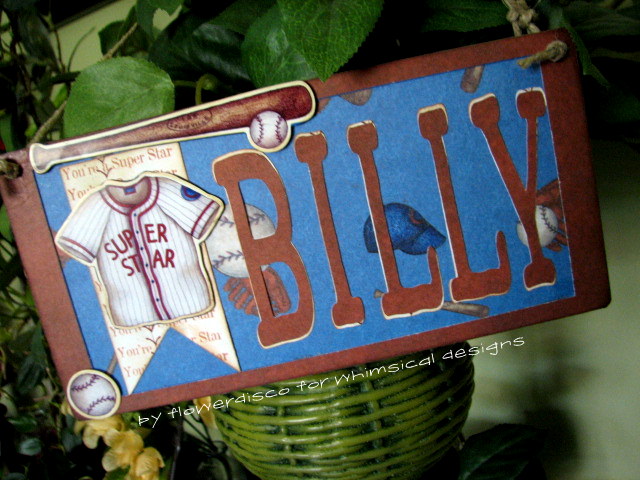
A BASEBALL SIGN...an altered frame

welcome 
i bet you have lots of things you can alter, lots of things you can make prettier. lots of things that deserve a facelift.
 (and, i am not talking about me here, ok?--lol)

i found this little frame made of super thick chipboard and i used it for the base of today's project.

Baseball Plaque
3.5 inches wide by 7 inches tall
i also found an 8 x 8 baseball kit that needed to be dusted off and given some use.
 i used a  clear stamp set to make my own background on the banner behind the jersey (baseball shirt) where i repeatedly stamped the sentiment "You're a Super Star".
it was just what i needed for this cute plaque.

the rest of the elements used are from the 8 x 8 kit i mentioned earlier. 
the name i cut using my cricut expression and the doodletype font cartridge.
this is so cute!
i am so happy i was able to make my own background for the banner.

and this is it for today me dear. i let you see a bit more of what the challenge is about and i really, really hope you join us every week. there is always a nice prize waiting for a lucky entry.


Create an altered project

Sponsor: V's Sweet Ideas - $10 gift certificate


thank you again for stopping by and remember to 
click and share

Wednesday, July 11, 2012

PAPER DOLLS DRESS UP SERIES---episode 12

hello all, 
we are almost done with the series. one more episode and  "see you later, alligator"-- hehe
 next time i need more teammates to make it go faster :P

anyhow, i hope you all had a great 4th of july. 

for this episode i had to work with page #77 (which is image #49 on the overlay).

My Shepherd
is on a dcwv mat to hang on my craftroom.
the whole hanging measures approximately 5.5 inches tall 
(not counting the wire hanger)
he is so, so adorable. i love how i clothed him too.

that dcwv mat i used, do you remember them? i bought them a few years back. it is thick chipboard covered with their textured white core cardstock. i bought them in all colors. they came in boxes. well, since i am a hoarder of all kind, i still have some. i used the tim holtz embossing folder called cracked. it comes in a set of two. the other one is called checkerboard and i love both.

the trees i already had in my "stash for another day" cuts, but i cut everything else for this assigned page.

i used twine and glued it with tombo adhesive to give it form: one for the sash i used on his clothing and, the other one for donkey's leach (whom i adjusted a bit using my gypsy).
i also tailored his clothes a bit using scissors. 
---remember you can click on the picture for a bigger view---

you can see here a bit of how i played with the twine.
 that little yellow diamond shape is from a mini paper punch from g studio. i like buying those for small details like this one. 


his face was stamped with peachy keen stamps and a bit of white ink pen for the eyes and, i also used stickles for the bling.
the star was done with the martha stewart paper punch "happy birthday" but i just punched out the star part and fixed it with to my needs with my x-acto knife.
the donkey was cut on american crafts cardstock and the boy's clothing in recollection. the doll was cut in kraft cardstock.oh! the crown was cut using a core-dinations glitter cardstock.
(the reason i am starting to list the supplies is for my own future reference, lol---since i forget a lot)

 i move on to my teammates projects now:

sheena
isn't this card so pretty? 
love the simplicity of it and the sentiment font is beautiful too.

kristie
i think kristie used peachy keen stamps for the eyes too...hehe
they have so many face stamps, oh my! i do not even want to look there anymore, hehe

dawn
front of the card

inside of the card
---a pop up card-
YAY!

well, this is it for today's episode. i will see you next wednesday for the finale of 
"PAPER DOLLS DRESS UP".

hugs to all and thank you for stopping by the hut!

if you have time, go to my teammates blogs to see more pics of their projects.
 i bet you won't be disappointed.
*-*


Wednesday, June 13, 2012

PAPER DOLLS DRESS UP SERIES---episode 8


hello fellows,
as you are coming here i am in the hospital having surgery, hehe.
well wishes accepted, negatives will be discarded, lol.

anyhow, here you are to take a look at what we made this week for this awesome pddu series.
this week i had page #61 where you will also find the native american girl, a tepee, a basket, feathers and a few more accessories. that is a lot, right? this is why i chose this cart for the series. it has a bit of  
almost every season/event. :P

i chose the vase and the corn stalk, yes, the cornstalk in a vase. but i think it turned out pretty cool.

Any Occasion Card
3 x 6 " tall
this color combo is nice too.
i used mini jewels from a dollar pack to adorn the vase and some small pearls for the cornstalk. this time instead inking i chalked the edges and details.
the cardstock is from dcwv. i really like that mute chevron pattern on the base.


this is the inside, simple but pretty. the patterned papers are just beautiful.

so what do you think, it worked, right?  i like to step out of the box and mix things around for fun. i am not afraid anymore about messing up my pretty papers. that was my biggest beginners fear, hehe but with so much paper in my stash i have to use before i die....i do not care anymore, lol.

lets's see what my sweet teammates made this week for the series.
--- remember clicking on the pics will give you a bigger view and clicking on my teammates names will link you to their blogs where they explain more about their projects---.


awesome clown and you do not have to be afraid of this one. he is a bundle of love. :P


beware of the rise of the apes, hehe (like the movie, i mean)


this is what dawn was doing this past weekend because.....
it was dawn's birthday this past sunday.
happy birthday to you sweet friend.
this canoe makes me go canoeing on the river behind my house :P

aren't these projects awesome this week? 
(as every other week, imho)

well, this is it for this week. i do not know how i will be feeling and i really haven't been in the craft room too much lately since the weather has been beautiful and my back has been out again, :( hehe.
 i tell you, i do not know what kind of stage in my life i am these days, but is not settling too well with me, lol.

see you around and 
thanks again for stopping by the hut.

next episode of the PDDU series will be next wednesday, june 20th.

Wednesday, May 23, 2012

PAPER DOLLS DRESS UP SERIES---episode 5

hello bloggers and friends

here we are with another mini truckload of projects from the paper dolls dress up cricut cartridge.

i hope you are enjoying it as much as we are making the projects.
they are all for fun and that is what is all about,playing with our toys---our oldie toys that is :P

here is my project for today, 
(way ahead for the season-hehe)

Beware October
3.5" x 7" tall
wall hanging/decor
i chose the cat among all the other images i had on the assigned page. i did some wet embossing with a g-studio clear stamp.
anyway, i worked with page #49 and you can find the cat on accesories 1. i made him skinnier with my gypsy and add some stickles for eyes, nose and collar.

the orange banner is a clear stamp from 7gypsies. the greenish banner was cut by hand from a strip of halloween paper which already had the word "beware". the moon and stars are from page #50 accesories 3 shift.

the thick chipboard where i mounted everything is from acm and i purchased these when they were selling thick shaped chipboard albums. i got a bunch of them to alter.

and....i am ready for halloween with this spooky decor :P

---onto my teammates projects now---


thanks you so much for being so nice and taking time of your busy schedules to visit us.
we will be back with episode 6 next wednesday, may 30st.

big hug!


Wednesday, February 15, 2012

SWEET- a wall decor project

i do not know about you, but i am ready for spring. it does not matter that we hardly had any snow, or cold weather for that matter. i am skipping the gold from the irish for spring...lol.

 here i made a wall art decor. i already made some simple ones, but this one took me a bit longer. 
my inspiration was seeing my spring flowers already showing the green tops above the ground.
enjoy!

Sweet
3.5 by 7"
pretty, uh?
(wink)

i had/have these pieces of chipboard in my stash,  from albums i never altered---- they are like almost 1/4 of an inch thick and that is the base for my frame. 

this awesome tag is from k&co. i distressed it a bit with ink and added a bit if stickles to match the rest of the embellishments.

the sweet word is from paisley (cricut cart)---i wet embossed it with thick clear embossing powder and inked the edges too. i cut it four times, and glued the cuts together for dimension. after you have done this, they look like chipboard, and you get to use some of that cardstock in your stash before it rots, lol.

the square and circle are from the same k&co pack and the yellow pleated ribbon from recollections. the heart is from an old miss elizabeth product.

i made the holes with the pink crop-a-dile and added some eyelets and wire. the crop-a-dile is an awesome tool. it goes through everything--, including tin from pantry cans and new holes on your belt and sneakers if needed. ;p

this is the back. 
i added that strip of paper with re-enforcers to add sustainability.

here you can see the thickness of the chipboard.

and these, precious flowers below, are my own-- handmade.
i used ribbon, a needle with thread, made a few stitches until i gathered the 4 inches piece of ribbon and then glued it with my glue gun...ouch!!!. i got burned a few times. (i have to find a better way to make them)
 but----i LOVED the final product. you should try to make some.
 i also added a tear drop shape faux jewel to serve as a leaf. so cute!

any questions, please do not hesitate to ask...just shoot me an email or write on the comment area.

---thanks for stopping by---
your visits fuel my creativity and keep me crafting.
 thanks again!


Monday, October 24, 2011

THE WITCH---A BITTEN BY THE BUG 2 CHALLENGE

what a nice image we have this week for the challenge. you will find it in the happy hauntings cartridge but as you might know already, if you do not own that cart, you can use any other that has a similar image.
come on!!! and have fun with us.
this project will be perfect for this halloween and many more to come.
i made a home decor/wall art project. it is so darn cute you are going to love it.

The Witch
6" x 9"
misses witch here was cut at 3"
and can you believe i do not have black glitter?
i was so upset because i wanted to cover her gown and cape with glitter (and did not want to go to the store), so i added some sparkles with a silver glitter pen i own.

i added some dimension as you can observe here.
(it looked like too flat on the frame without the foam tape).

these pretty papers were cut as follows to cover the 6 x 9" chipboard frame:
from the top: 3- 2 x 3"
center: 2- 1 x 3" in each side and the middle one is 4 x 3" (where the witch is)
and then 3 more pieces 2 x 3" for the bottom part.

added some rhinestones, some bats border, the crop-a-dile made the holes for the purple brads and black wire was used as the hanger. of course i inked every piece and added some ribbon to the wire.
below is the complete project:
please join us if you have time.
click HERE to see what my dear teammates have made with this image from happy hauntings and to add your project.
Remember these challenges, at Bitten by the Bug, run for two weeks.

-----------------

NOTES: since i did not have no other entries on my mr. V challenge but one who followed the requirements, the fabulous BRICKED EMBOSSING FOLDER will go to
jayne designs from the UK. YAY!!!

CONGRATULATIONS JAYNE!!! 
(jayne the rules are you have three days to claim your prize or it will be forfeited. you can find my email by my profile).

Monday, August 22, 2011

BEWARE--- A BITTEN BY THE BUG 2 CHALLENGE

 hello 
i hope you all had a great weekend.

this week at the Bitten by the Bug 2 we have a sponsor:
The Stamping Boutique
click here for the link if you want to check them out.

i tried my best with this project and my apologies to those who have mastered the art which i just mutilated with my inexpertise.

Beware
4x6"
(photo heavy) 
:(
 this was my first try but i decided to add some grass or something 
below the fence.

i used a MS punch and border to add these details.

much better here right? :)

i then added a frame, but the wrong one. :( for this challenge i had to use a frame from "happy hauntings", ooops! --sorry heather.


and the beware sentiment is from My Pink Stamper latest release
"spook-alicious".

here is my scarecrow in all its glory, :)

now, if i tried, you can too.
go ahead and participate in the challenge.
you can see now you do not have to be a pro. just have to be brave and try something new. and then publish it for the wide world to see, hehe

notes... i do not own any fancy markers and all i had was a crayola watercolors set and that is what i used to color this image. i also used watercolor paper i had in my stash.

click on this logo above and it will take you to the site so you can participate in the challenge and have fun with us too.
and...if you leave me a link to your project i will then select one for a little surprise from me to you.

thanks for stopping by.

love you all!