Showing posts with label CRICUT SERIES. Show all posts

Wednesday, February 4, 2015

BITS AND PIECES SPEECH BUBBLES

i do not know about you but i am getting a bit overwhelmed with all the bits and pieces in this cart, lol
(i can feel this is going to be a short series)

0h! and did i tell you i got the monthly cricut subscription? i love it. just looking at all those images in color opens a new world of possibilities and dreams. ha! i can also feel mine are dreams, just dreams, hehe,  because i am so busy these days with nothing. when i say nothing is the days just go by and there i am, stuck doing nothing, lol. oh well, pain is insane. gotta make the best out of it all.
the weather has also been insane, it feels we are in the ice age, brrr!
(have been training lulu to use her "needs" pads since summer, in anticipation of bad weather and also for when we go out and she has to stay behind. she does pretty good. i am proud of her. she is a smart cookie that lulu is.)

onto the bnp series: they were working on the design space software yesterday and i was having many difficulties. so i stopped, did some chores and took care of lulu's nails. by the time i was able to do any crafting i was already done for the day but i had done another cut for etsy so i will share that with you today.

Chevron Speech Bubbles  
image #MFC57C on design space

same ones in blue

and some mini cards 
(#M100B03)


and i also made more volkys (#MFC5E8)...sold the ones i had on etsy already.
 the green one for st patrick's day :)

and another love day one in red
hoping i will be in better shape and on time next wednesday,
until then,

take care.


Tuesday, August 17, 2010

8/17/10 UPDATE FOR ANOTHER SERIES

***For the 8/16 Card Swap Update click HERE 


 ANOTHER SERIES
  1. JESSICA W.
  2. MELISSA WARD
  3. HELEN
  4. AJOY
  5. OHHH SNAP
  6. ABBY
  7. GABY
  8. AGNES (ME)
If you ladies still interested in doing the series, PLEASE,

Email me at _flowerdisco_at_gmail_dot_com

I will send emails with blind copies unless you give me authorization to share them with the other participants.

Thanks and I will be happy to hear from you.

Saturday, August 7, 2010

ANOTHER SERIES?

WHO WANTS TO DO A SERIES WITH ME?
I will Random it.
We will decide how to do it then, ok?
Thanks!

For the Sweet Pagoda Challenge,
Please,  
CLICK HERE

Tuesday, June 22, 2010

WILD CARD WITH LISA GRAND FINALE/ENVELOPE

Dear followers, friends, bloggers and all who stop by to my work...
I started the Wild Card Series with Lisa back on January 1st, 2010 with the Scallop Card.
Lisa contacted me after I made a comment on her blog asking if we can do a series together and that is how all started. Lisa couldn't finish all the cards because personal reasons but we together did most of them, one by one.
I contacted Lisa last week for the Finale of the series to see if she was up to one more but she is not going to be able to. I was looking forward to her response because I think it would have been nice if she could have joined me on this last one, which happens to be the envelopes but this would have given us a free will to make any card we wanted.

At the end of this month my term with Robyn aka My Pink Stamper as one of her designers,
will come to an end.
It was my first Designer Team experience and I learned a lot from it and I am very grateful to Robyn for giving me the opportunity to be one of the first ones on her first Design Team. It was an honor and I had lots of fun. Check the above MPS link to know the requirements to apply to be an MPS designer.
Good Luck and have fun.

So...I am done with the Wild Card series and done with Robyn almost at the same time. Ironic? or Coincidence? or a new window of opportunities? I do not know. I take one day at a time. I still have some projects to do as a MPSDT designer and then I will hopefully have a bit of extra time for my blog and maybe do some fun things with you guys. Let's see!

Now...I will introduce my last card and envelope from the Wild Card cartridge Series...
#50.... 
YAY!!!.

My Envelope
9.25W by 6-1/8"H
and the card I made for the envelope.
I used a Martha Stewart punch for the envelope. 
It is a big envelope...It needed to be big for the Grand Finale, LOL.
I used  the same paper I used for the card background. 

********
My Card
8-3/4W by 6"H
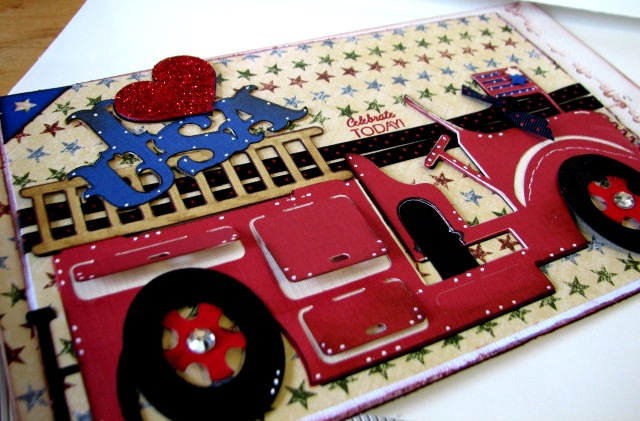
 The fire truck is from the Independence Day Summer Collection seasonal cartridge and using my Gypsy and Expression I cut it at 4.50"H by 8.75"W and the layer came out to be 4.5"H by 8.44"W. I welded the I heart USA onto the ladder and I used very fine glitter to cover the heart. I also draw some doodles dots.That little blue star you see on the flag it was not supposed to be there...it is from when I did the corners and I punched it with a star punch. I did not realized when I took the photos it was there, lol.

On this photo you can see the small compartments on the fire truck opening up and you also can see the tires centers had been popped-up and a rhinestone added. You also can see an MPS clear stamp "Celebrate Today" from the Sweet Occasions set stamped with a Colorbox pigment ink. The card base is no other than a white textured American Crafts cardstock. the edges have been distressed on it and inked as I inked the truck too.

This word is from the same Independence Seasonal cart and I made a shadow layer in red but it's hard to see. The cart does not have a layer for this word. I cut this at 1.75"H and the width came out to be 4.41". I had to play a bit with it to get the shadow the right size. 


I hope you enjoyed our series and like I said I am planning to do some fun things with you/for you guys.

Thanks for being there with me all the way and I know I inspired some of you because I read all of your  comments and that does makes me happy.

XOXO 
to all.

NOTE: I joined the Cricut Circle (Agnes is covering her ears, lol)


Thursday, June 17, 2010

WILD CARD WITH LISA/GIFT BOX

Hello everyone!

I want to take a moment here and acknowledge all my new friends/followers. I am so happy you guys are here and I hope I do not disappoint you with my work.
I am no pro but I do try my darn best to do a fine job here. So with that said, feel at home and know you have more than a blogger here... you can find a friend in me too.

Hugs and a BIG WELCOME to all.

Today we have the Gift Box, #49 in our series and you can find it on page #80 of the handbook.

My Gift Box
7 inches
(I believe this is a max size on a 12 by 12 mat)
 This is my take on it. I know other crafters use a clear sheet to cover the front and they put candies/cookies in it but because I like to make boxed card sets this is what I made.
I used the Tim Coffey designer paper from K&Company and for the solid paper I used My Minds Eye.
This squared box at 7 inches ends up to be a 4.5 by 4.5 inch box. I hand cut the flower on the front from the same designer paper and I was going to do more to it but time did not allow it. I will make a better flower when time permits and then I will edit this post.

This is another view of the box.

These are the cards I made and to be truthful I used the Gypsy to cut the same cut that the gift box has on the front and I couldn't decide where and what size I wanted it so I opted for this one and just leave it simple because the paper is so awesome. (It took me a while and lots of scrap paper trying to make my mind, lmbo) Oh! and this paper/cardstock is from The Rockstar stack from DCWV because I did not want to keep using the beautiful paper from K&Co (shame on me, lol) but this DCWV paper/cardstock is as beautiful as the K one and it did hurt to use it too :D

I made 6 cards (2 of each) with their handmade envelopes. 
The sentiments are stamped from different clear stamps from my stash.
The cards are 4.25 squared and the paper is 4 inch squared too. I inked all of it too.
I will give you the measurements for these envelopes. I used my Martha Stewart score board. 
DIRECTIONS TO MAKE YOUR HANDMADE ENVELOPES
FOR A 4.25 INCH SQUARED CARDS.
---You need a 6-7/8 inches squared piece of paper (I used a printer/copy paper for these a bit thicker than the usual one).
---Align that piece of paper at the 6-1/2 inch score line on your score board and then score on the 4-1/4 inch marks on all sides. 
---Fold on the scored lines and Voila...you have a handmade envelope for your 4.25 inch squared cards. You can lined them up if you want.
***********************************

This is a view of the how it looks in the inside: cards and envelopes together.

I hope you enjoy this Gift Box from the Wild Card Cricut cartridge.

One more project from the series and I can't believe I will be done.
It is not easy to do the whole cart. 
It gets to you after a while :)

********************************

On another note I would love if you have the time and stop at 
Mrs. Donna Mundinger's 
 and take a look at the Shower card she made. Donna says I inspired her and that is a major honor to me because when you see Donna's work you are the one who will be inspired and amazed at her creativity. Please, do not be shy and go there and see it for yourself. You will be glad you did if you didn't already, that is :D
******************************
More hugs and love to all and 
Thanks for stopping by my friends.


Tuesday, June 15, 2010

WILD CARD WITH LISA/SHOWER

Hello my friends! 
I was just at the Cricut MB and what a mess this Cricut Circle has brought in to the board.

  and...I almost forgot about the Wild Card.
This is a very simple and beautiful card. I didn't make any fuss over it.
I think if you add too much, it will take away from it.

Shower Card
8 inches
(this is the max on a 12 by 12)
 I just took scraps of cardstock and put them behind the open cuts and
n the back of them I used a long piece
of the same American Crafts white cardstock I used for the base of the card and cover them.
I used those flowers to cover a mistake.
(my yellow cardstock peeled right on top while trying to get adhesive off of it) 
I also added some rhinestones for a bit of a bling. 


I used a My Minds eye 12 by 12 paper to make the envelope. The envelope has a nice shape to it.
You can customize it to your needs too.

Well, this is it for now.

 I hope you enjoy this simple card and I bet it look even better without the Prima flowers I had to use to cover the boo-boo.

Hugs to you all and have a nice day!

Don't forget to take a look at
Audrey's
Cute and Some
for Showcase #11.


Thursday, June 10, 2010

WILD CARD WITH LISA/CELEBRATE

I managed today to make the 
Celebrate card from the 
Wild Cards Series.
This card is #47 and you can find it on page #78 of the handbook.

My Celebrate Card
5 inches
I used the Latte Stack from DCWV for this card. It is a very soft textured cardstock and it cut very nice. I set the pressure and blade depth at 4 and had absolutely no problems.

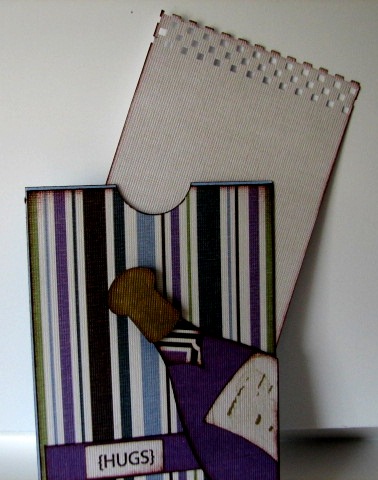
As you can see I made my card with a tag for the sentiment that you can pull out from the top instead the handbook version of opening on the side as a standard card. I used the MS punch called Checker Board to adorn the top edge of the tag. I really like this punch.
I also inked everything. The lid on the bottle was cut beige cardstock from the same stack and colored in with a golden color marker from from Dri Mark/Metallic Colors. I also like these markers.

I used the same marker to garbled a script for the label and I used the {HUGS} clear stamp from My Pink Stamper SWEET OCCASIONS set. I was going to use the one that reads Celebrate Today but I already had the little tag attached and it did not fit well in the small space I had.

The envelope is really nice too and if you want to make it a standard envelope you can with no damage at all.

Well, this is it for today.
Thanks again for visiting and you know I love you all.

Note: I already have the address for the winner and I have already part 2 of the game planned :D


Thursday, June 3, 2010

WILD CARD WITH LISA/HANUKKAH

I am not in love with this card at all. 
I do not like how it came out but for lack of time I didn't make the other version. I wanted to be kind of true to the original colors of blue and silver but for some reason I guess I left my mojo behind today.
This is what I got and please leave me you options
or tips how would you make this one more attractive to the eye.
This is card # 46 from page # 77 of the handbook.

Despite the fiasco I proudly present you 

My Hanukkah Card
5 inches
The blue cardstock base is from Debbie Mumm. I believe the silver one is from DCWV.
---
 I added Glossy Accent to the star after changing the color a bit with a marker.
I added stickles to the candles and embossed the darker blue paper.
---
 This is the inside and I outlined the phrase with my Cri-Kits black pen,
not that you can see it well on the photo.

I know you guys are very sweet and you are going to say it's perfect but I know is not me...not my style.
 But...that is what came out today :(

(SUGGESTIONS ON HOW TO MAKE IT BETTER ARE WELCOME) 

UPDATE: My pearls were too big for the star but I found this little rhinestones ones on a pack I have in my stash. They were pumpkins but you can take the tiny jewels apart and that is what I did.
I definitely think it looks much better.
Thanks again for your input ladies.

Here is the new and improved Hanukkah Card
 What do you think?

Hugs to all!

Tuesday, June 1, 2010

WILD CARD WITH LISA/CARRIAGE

Hello my friends
I hope all of you had a nice weekend...
a nice Memorial Day Celebration.

I am here to introduce you to another card of the Wild Card Series. 
This is # 45 from page #76 of the booklet.The largest size you can cut it is 6 inches on a 12 by 12 mat.
Now, 
I present you with
My Carriage Card
5 inches
 The papers used are from KI Memories Classic Prints I purchased at Hobby Lobby.
---
I had all the images on my Gypsy.
I had pressure and blade depth at 3 and it cut like butter, lol.
---
This is the inside.
(NOTE:  I adhered all the KI papers to a cardstcok base from Debbie Mumm).
---
The back of the card and the envelope using a construction paper again.

Lisa's Carriage Card
(not avail)

I hope you like it.

This is another one I made on November of last year for my niece.


Hugs to All!

Another Note: If you want to participate on Audrey's Showcase
please click HERE for more info.

 Have Fun
with it.


Thursday, May 27, 2010

WILD CARD WITH LISA/HOUSE

Well, I finally got here.
I started this card this morning, then I had to go to the gym, came back 1-1/2 hour later. My flowers were really thirsty and had to attend to them. Then it was Lulu and blah-blah-blah and I finally got it done.
Hold your horses now and enjoy my

House Card
7.75 inches
(I think this is the max size on a 12 by 12 mat)
 Where do I start?

 The card base is a kraft cardstock, a bit thick for stability. You will find embossing with the cuttlebug, inking because I love inking, stickers, the Sweet Treats banner is from
Christmas Cheer and the font is from Blackletter.
-----
The candies and pink ribbon and the swirly mint are stickers from the $ store.
-----
The banner was cut at .86 inches and the font is .42 inches. 
For the font I used my Cri-Kits pens.
-----
The balloon and the cupcakes are also stickers and the small leaves are from a punch and I treated them like they are making them now: misted, crunched and inked, lol.
-----
You can see the leaves better here.
-----
A Big Sundae is waiting for me when I get skinny again, lol
It will be my reward :P
-----
The inside and the envelope. I got some ink on it but that is ok.
The top flap of the envelope was punched with a Fiskars punch.


This was a lot of work but I really enjoy this type of work when I do not have pain, lol.


Enjoy and if you have any questions, please use the 
Frequently Asked Questions
since it is just there laughing at me and waiting to see who will use it first, :P


Love You All!

Tuesday, May 25, 2010

WILD CARD WITH LISA/ORNAMENT

Hello to all
I hope you are doing great and that summer keeps 
arriving to your door without many rainy days. :P

I haven't heard from Lisa and I am not going to bug her about this, 
so I am just continuing with the series until I am done 
The name of the series will stay the same because she still a part of it and
when she is ready maybe she will post.

Today I have the Ornament Card, #43 and from page #74 of the handbook
This card you can make it up to 5 inches.

My Ornament Card
3 inches
 On this card I used a patterned paper/cardstcok from DCWV
"Holiday Collection" from this past year. It is a double-sided cardstock.

 I added a bit of golden color cardstock from DCWV and a golden twine I had in my stash for
the ornament and for the tree on the envelope.

I also added some little dots of stickles to the center of the flowers? on the paper.
NOTE: the three inches will give you a small card but that was my intention, to vary a bit and give you another idea since you still can attach it to a present.


Well, this is it for today.

Thanks for stopping by and for the love you always leave me with. 

xoxo


Thursday, May 20, 2010

WILD CARD WITH LISA/GRADUATION

EDITED TO ADD

ANY SIMILARITY YOU SEE ON THIS CARD AND MY PINK STAMPERS CARD FROM THE NEW MINI MONSTERS CARTRIDGE IT IS JUST PURE COINCIDENCE. I COULDN'T BELIEVE IT!!! I JUST WENT TO HER SITE AND SAW THE WITCH'S HAT ON HER CARD (IT IS 5:10PM EST AND I POSTED MINE AROUND NOON TODAY) IT IS A MINI OF THE HAT ON FRONT OF HER CARD TOO...
THIS IS REALLY-REALLY SPOOKY.
OH MY!
I WILL HAVE TO EMAIL ROBYN AND/OR DIRECT HER TO MY BOG ASAP.

------------

HELLO TO ALL AND A BIG WELCOME TO MY NEW FRIENDS/FOLLOWERS
Feel at home and do not be afraid to comment. I would love to hear your thoughts about my projects.
 Well,
Today is Thursday and I have been busy getting some things in order and just now I finished the
Graduation card for today.
I did not like it they way it came out at first and after playing a bit with my brain
I came up with this one instead.

My Graduation Card
6 inches wide by 4-1/2 high
I used a regular standard card base just that the measurements are a bit odd, lol
The envelope is from page #35 using the blackout feature.
As you can see I made a mini card as an embellishment instead making the shaped card.
----

You still can open it as if you would with the original sample on the handbook :)
Can you see it on the photo? sorry but It is a bit hard to tell :(
---

I also used the Making Memories Scrapbook Stitches that is no other than floss thread, lol to make the tassel and added a rhinestone.
I also inked everything with black ink for definition.

---

This is the inside.
---

The supplies used are American Crafts textured cardstock, plain white cardstock from Walmart, patterned paper is from Colorbok (I found at Ross).

I hoe you like my variation here since sometimes is really not much you can do with some shaped cards.

---
Lisa's Card
(not avail yet)
---

Have a great Thursday and I think today is the day where Provo Craft will be annoucing (if not already) some of the new carts. I can't wait to see the whole handbook.
As I write this I haven't have the opportunity to go and check it out and still have other errands to do yet so I might have time after all of you are already drooled over them I hope they are worth it. So far from the sneak peak I like the Halloween and the Monster ones. I do not know if they released them today or not.
 Which ones you like best?

And,
Remember to click
HERE for the Chrip/ Shopping Bag giveaway

Thanks for visiting and feel at home.

Love you All
xoxo


Tuesday, May 18, 2010

WILD CARD WITH LISA/OWL

HOLA!

Today is Tuesday and I can't believe is the third week of May already.This month was a Hi and Bye kind of month...like a doctor's 15 minutes visit, lol.

We are almost at the end of the Wild Card Series with this Owl Card being #41...9 more to go and it feels I have been doing them forever. You can find this card on page# 72 of the cartridge handbook. 

I also want to post here about Audrey's Showcase. 
Stop by her blog and see what is all the fun about.
Click HERE if you desire to know.

I also want to CONGRATULATE to all who graduate this school year of 2010.
A Big HOORAY for them.

Now, I will present my
My Owl Card
5 inches
 Isn't he cute?

Look at his little beak. I do not know how I am folding it to put it in the envelope. 
That is going to be a task, lol


I used American Crafts textured cardstock for the card base and eyes. The designer scrapbooking paper is from Prima Marketing: The First Blush Collection. The envelope again is from a construction paper pack I have in my stash.


The inside phrase is done with my new Cri-kits pens and filled in with an American Crafts glitter marker. 
I wanted these Cri-kits pens so bad and today was the first time I used them. I got the four packs: metallic, pastel, reg.& neon and the glitter ones. I used the black glitter one for the outline not that you can see the glitter at all in the pic. It does looks better in real life. To use these pens you need the metal carrier. I got all these pens and the carrier from Scrapbook Corner online store. I got free shipping with my order but I am not sure if they are still offering it. This is not a commercial...I paid for all of them including my carrier...they are not my sponsors and this is just a comment I am making in case any of you wants to know.

Lisa's Card
as we all know Lisa hasn't been posting hers due to personal reasons. 
Whenever she is up to it, she will be posting hers and then I will edit my posts to include her card.  
Let's wish Lisa the best with her pregnancy.

Thanks for stopping by and for the love you leave me.
Hugs!