Showing posts with label BUTTERFLIES. Show all posts

Wednesday, July 15, 2015

BUTTERFLY ON CANVAS

the inspiration for today's project comes from my own backyard.
 i have been planting perennials for 3-4 years now with birds and butterflies in mind 
and, i have plenty of birds. no problem with that. just yesterday i saw one i hadn't seen around. a kind of woodpecker called northern flicker. what a beautiful bird!
 but, i am failing attracting butterflies. this year we got a few more common butterflies showing up. i think that is a good thing, :) maybe i am not failing after all.

anyway,
the butterflies are what inspired my project and 
for today i am working with a new arrival to the store:

in this post i am also explaining how i download and save my digi playground files or any other files/images i want to save in my computer.
(a bit of pic heavy post) :D
hope it helps.

first,
My Butterfly on Canvas Project
the file is for a 5 x 5 card but needless to say, i cut/sliced off the other side of the card and i kept just the butterfly part.

i used white textured cardstock for the butterfly outlines and 5 different color cardstocks for the inside: aqua, green, orange, pink and yellow.
i then used the negatives of the color cardstocks to paper piece? my butterfly.


i used the clear wink of stella to add the shimmery effect you see on the above pic.
(the background clouds paper is an oldie from dcwv)


-when done i adhered it to a mini canvas with my tape runner-
(5 x 5)
filed the edges and voila....
 "a butterfly on canvas".
hope you like it as much as i do.
it was a darling to make.


-this is nic's butterfly svg-
check it out, the pic is linked to the store.

and as always,
thanks for stopping by!

-----------------------------

now onto the tut of how i save my digital files.
remember you can click on any pics for a zoom in.
(know i have a pc not a mac, it might be/look different if you have a mac)


1- after purchasing or acquiring your file(s) you will be prompted to download:


normally, when you download images or copy and save images from the internet, it automatically defaults to a download folder in your computer. i recommend you find your default download folder prior to download just that you know where it is located (in case you do not know, that is). i also recommend adding a folder to your default download for your digital files and add a sub folder for each file you save. it makes your searches easier.


2- clicking on that red download button will take you to the page where your purchased image is:
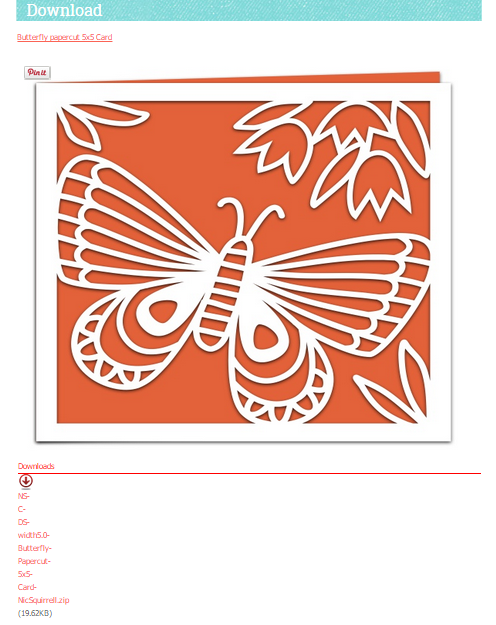
you will see another red download button: click on it and it should automatically take you to your default download folder. (you should have added that other folder for your digis and maybe a sub folder if you wanted to---makes it all better). 


3-  if your download folder is not highlighted, you can click on it for your file to go in there and then click save. --your computer screen should look similar to the pic below. 

see that "extract files"?

click on it and that will open your files, ready to be used: (please, ignore my library, that is where i keep mine). 
the file(s) are now open (unzipped) and ready to upload to your electronic cutting program/software. 
i use cricut so i upload mine to cricut design space.

the one for cricut design space is the second one: see the DS for design space? (NS-C-DS). (i believe the first one is for any other software other than design space). some files have digital stamps, or pdf's you can print out and cut by hand. you can separate them in individual folders if you want to or just keep them all together in the same file folder. and that is that for the downloading and saving.
if i didn't explain it clearly, please, do not hesitate to contact me if you are using a pc (not mac) and i will be glad to help you step by step.
:D

----------------------

blogged by flowerdisco
from 


Sunday, June 30, 2013

WE ARE THE WINGS....a handmade card for the cutting cafe

hello all...
i am welcoming you to my blog today with a beautiful sentiment and card from 
 this file is called social butterflies and i immediately fell in love with this image and its sentiment.

"We are the Wings of a Butterfly, bound together with the Love of God"
4.25" x 6"
-sorry about the cloudy/washed out pic here-
(maybe i am not used to soft colors and i think is washed out)
once again, i used the pdf doc file for this card.
i printed out on patterned paper and the with the x-acto knife i cut out the leaves to back them up with a patterned paper. at first, i was thinking to color them in  but changed my mind. i think the twist of thoughts turned out much better and it was a fun.


 i did some of the zig zag stitching to secure all the layers together in place of adhesive.
(after  securing them in the middle with my atg, just a short diagonal line)

please, remember i cut by hand and not all is perfect, especially when i drop my x-acto knife with my last new blade  on the floor, and the tip broke, lol.


 i hope you try this, it is nicer in real life...the pics are awful. so sorry!
i will try to re shoot and re placed them.
ETA: took new photos/replaced them but still couldn't get any better....i am leaving them like this---so sorry.

this social butterfly set comes with 22 images and it has more than a dozen individual butterflies and a few sentiments, including some round ones.
there is another pretty sentiment you are going to love.

i hope you have a great sunday and a better week.

thanks for stooping by!


Friday, May 3, 2013

SKETCHY FRIDAYS NEWS

hello

and a huge happy mother's day to all!

 i have some sad news:

this week we are closing down 
"Sketchy Friday".
I am so sorry to see it go but it is a decision sonia made. She knows better and she knows the Y's.

i want to thank all of you who came to my blog from Sketchy Friday. i appreciate you taking the time to come over because you liked my project using sonia's digis. 
who knows what the future holds for sketchy friday, if any. :(

thank you sonia for giving me the opportunity to enjoy your super cute images and i wish you the best my friend.

here is a card i had made for my turn next friday but since there is no more sketchy friday i am sharing it with you today. :)

sonia has these gorgeous butterflies in her shop and i chose my favorite one for today's project BECAUSE, sonia will keep her SK DIGIS store open and sonia will continue designing, you can still enjoy her designs. that is a huge plus, lol. 
we won't loose it all :)

anyway, this is my card for you today
Fluttering by to Say Hi
3.5" x 5" tall
the butterflies were cut by hand and the jar was cut using my cricut expression.

i used vellum for the jar and my spectrum noirs for the coloring.
(since my butterflies were printed at 1 inch and 3/4 inch high, i chose to cut off the antennas to make it easier to cut by hand, but they do come with the antennas)

i also added some other butterflies inside the jar along with some glitter)
i also loved all the papers i chose for this card. 
and the stamped sentiment is adorable too and i loooove that font.
i hand cut that extra bottom piece in patterned paper. i think it added so much to the jar.


SUPPLIES USED 
IN THE MAKING OF MY CARD
digital image:     SK DIGIS
patterned papers:     fact from basic grey (red) and traditions from carta bella (blue/yellow)
yellow enamel dot:     my mind's eye
vellum
cotton twine

any questions? please contact me and always remember to
click and share
for others to see pretty projects :)


thanks for stopping by and have a super beautiful MOTHER'S DAY weekend!

Friday, January 13, 2012

MY PINK STAMPER PINK-A-LICIOUS BLOG HOP

it is a new year!!! and this is our first 
Pink-a-Licious
blog hop.

WELCOME ALL
i hope you find it refreshing and enjoyable.

this will be my last project for the My Pink Stamper Design Team, 
since i have resigned due to personal matters.
I want to thank Robyn publicly for given me the opportunity to be in her design  team for almost 3 years. i am immensely grateful and to maria--our team leader---who has been up and down and all around with all of us...
thank you, thank you and thank you. 

it also have been a pleasure to work with some awesome designers and learn so much from their personal styles.

my project for today is a "Thank You" card for all of you too whom have been with me for a while and for you who has come from my pink stamper blog and have become my followers.
love you all!

5" x 7"
thank you card
this "thank you" is from the first stamp set robyn (mps-my pink stamper) started from. i was then a newbie on the blog world and making cards. this is my team---my pink stamper team---the first design team i ever worked with and i am so happy for it. i wanted to use the same stamp set to finalize my days with the team. this set is called
"sweet occasions".
i used a white pigment ink to stamp with and the pretty patterned paper is from dcwv--travel stack.

the butterflies are in the ashley's alphabet cricut cartridge. the rounded scallop is a fiskars paper punch and the heart is from the same "sweet occasions set".


all cardstock has been inked and the scalloped paper pierced. some stickles were used for the bling-- :-)

and here you can see the whole card.
hope you are having a great hop and please, remember robyn always has awesome giveaways for a lucky participant. click ------HERE,  to go to her blog and learn about the challenge.

i will be back as time permits. some health issues are keeping me somehow resting...hehe

also, here is the line up in case you need it:
me
 thanks again! 
oh, i have a small giveaway and i will choose a visitor/winner this coming week---what about wednesday the 18th!
you must claim your prize within three days of announcing it.
*_*

Friday, November 11, 2011

MY PINK STAMPER PINK-A-LICIOUS BLOG HOP

WELCOME
to our monthly
PINK-A-LICIOUS BLOG HOP
my name is agnes and i run this my flowerdiscos scrap hut.
i am also one of My Pink Stamper designers and i hope you have lots of fun with our hop.
we have a line up you can follow but at the end you must go to the
My Pink Stamper website to participate in her challenge. My Pink Stamper designs clear stamps among many other things has tons of video tutorials on you tube and and  
tons of fun projects and lots of giveaways.
her stamps are of great quality and i love working with them. you will find lots of versatile sentiments, phrases and punnies among them.
we are showcasing her latest release in this hop.
my project for today is a mini album.
i used in my mini the "flowers & friendship" set

The Earth Laughs in Flowers
2.5" x 4.75"


the "happiness" on the tab is from this new release too. the little dots on the background are from her first release, yay...her first release and i still use it often enough.


the base for my mini is 10" x 4.75" real size
i used the from my kitchen cricut cartridge for the tab folder.
i scored it at 2.5", 5", 7.5". 
each panel ends up being 2.5" wide.
the sentiment above is from another stamp set called:
"everyday sentiments".
the sentiment on the right is from this new release:
"flowers & friendship"


the "my journey" was stamped with another stamp set called:
"font-a-bulous"
the "heart to heart" is half of one of stamps from the "flowers & friendship" release.
the mini red hearts the fairy on the left is blowing away are also from her first release and before i forget the name is "simply sweet occasions".

and of course, the most beautiful one, in my opinion, is the title for my mini
"the earth laughs in flowers".

as i always say, these My Pink Stamper clear stamps sets are so versatile you can use them in any project. be creative with them, and do as i did with the heart to heart and the happiness on the tab . all i wanted on that page was that and i was able to stamp it the way i wanted it.
you can too!
any time you hover over "my pink stamper" on this post, it will take you to her site.
you need to stop there to join the challenge and why not check out all her stamps while there.
one by one, you can own them all :D

if you have any questions on my mini, please, email me.
i did not want to keep you here forever reading instructions since this is a hop and
we are 20 designers, what makes it 20 stops :)

THANKS SO MUCH FOR STOPPING HERE ON YOUR WAY TO 
MY PINK STAMPER PINK-A-LICIOUS BLOG HOP

NOTE: before i forget, ;D--- i do have a set of stamps from my pink stamper to giveaway. i will post the winner some time the week after the hop. you must claim it and you have three days to do so.

*************
this is the line up in case you need to start from the beginning.


Robyn (My Pink Stamper)
YOU ARE HERE---THIS IS ME


AGAIN, THANKS FOR STOPPING BY AND REMEMBER,
WHO EVER WINS THE STAMP SET,
MUST COME BACK TO CLAIM IT WITHIN 3 DAYS.

 HAVE A GREAT HOP!

Tuesday, August 23, 2011

MY PINK STAMPER DESIGN TEAM MONTHLY PROJECT

 today is our monthly design team project for 
my pink stamper. we are using a stamp from the latest release. you can see them all HERE. they are worth the click, trust me!

i decided to use the yummy-licious one for my project.

Welcome
it is a tag
(we are getting a new neighbor on our street and this gorgeous tag will go along some yummy cookies)
i keep using some of the papers i found in my stash. they are so beautiful!

the house is from kate's abc's, image #26 on the overlay and cut at 1.96 x 2.92". i had to manipulated a bit to fit on my skinny tag. i cut it multiple times to get that thickness i am trying to get you to try. :P i am liking it a lot. 

the tree is from every day pop up cards: image #14 on the overlay and adjusted again to fit my tag. the tree dimensions are: 1.5 x 4".

i inked everything of course, lol and attached that twine with a tiny jewelry finding i smashed a bit to fit ;P

the flowers below the house windows are from the first stamp set  i received from my pink stamper: the awesome "simply sweet occasions".  when i lost the "hi" one from this set and i was devastated, :(
anyway, i stamped the flowers on a mat border i cut from paper doll dress up. the image/mat i used for the  "welcome" 
is from gypsy wanderings.

please stop at robyn's blog (My Pink Stamper) to see what my darling team mates have made with their stamps. i bet you you will be having a feast.

thanks you so much for stopping!


Sunday, August 7, 2011

YOU'RE ONE OF A KIND

 You're One of a Kind
5.5" x 4"
i have a butterfly bush i purchased 2-3 years ago from a home improvement center. it was on the clearance table for 50 cents. the poor thing looked very, very bad. i said to myself i had nothing to loose and saw it as a challenge to try to bring it back to life. well, it did that and more and it really does attracts many butterflies. this butterfly bush brings so much happiness to my life. i get to enjoy all kind of butterflies and each one is
"One of a Kind!
I knew Robyn aka My Pink Stamper had come out with a set of clear stamps that was the perfect one for my card. I found it one of the May 2011 releases and it is called:

i used the cricut lite Live Simply for the butterfly. it is image#16 on the keypad overlay and i used all the layers. The size of the butterfly is 3" high.


the tag for the sentiment is from Ashlyn's Alphabet, image#29 on the overlay and measures 2.6"by 1".

i have been working with these box of patterned papers i have in my stash and i do not remember the manufacturer. But, they are really good looking papers. I will dare to say they are from K&CO.

to the inside of the card i just added a strip of paper i had leftover from the front of the card. i might add to it.

well, thanks for stopping by and know soon i will be able to visit your blogs. 
Love you all!


Monday, June 27, 2011

DETAILS....


hello sweet friends. hope each one of you is doing FABULOUS!!!!!!!!!!!!!

graduation party is getting closer and so are preparations. my husband will be cooking and i will be his assistant along with some other helpers. hehe...that will be some FUN! for a change ;p

anyhow, for de-stressing and taking my mind off things i worked on this card on and off like for two days, lol

Details
4.25 x 5.5"
i used a few cartridges and welded a few images using my gypsy.

the card base is from "just because cards" page #63 image #40. the banner is from "christmas" image #29 and the mat for the sentiment is from is from "cindy loo" and is image #10 manipulated for my purposes--hehe. the font for the word "details" is from "graphically speaking" image #25 using the type feature and welding the letters. 
i had to cut things a few times and tweak them here and there but i am happy with the results.
the butterfly is a chipboard accent from k&co.
those little epoxy flowers i believe they are from some dollar bin or maybe from sticko brand, they are really cute.  -----------TIP: when i use cheap products i do not rely on their adhesive so i always use my adhesives and in this case i used "zip dry".

the patterned paper is from dcwv: the cafe mediterranean matstack.
absolutely stunning colors.

 a bit of messing up trying to add the small pieces to the negative of the word--  :(

i was very pleased to find the butterfly. the colors matched so very nice!
i love when you find a perfect match in different brands.

a side view.

and the inside sentiment compliments the one on the front very well
"DETAILS"
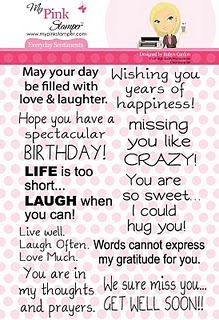
LIFE IS TOO SHORT...LAUGH WHEN YOU CAN!
also................. it is my best piece of advice to you.
the sentiment is from one of "my pink stamper" clear stamps set called:
"everyday sentiments".

i sure hope you enjoy it and it serves as some kind of inspiration.

love you all!
*_*


Wednesday, February 23, 2011

POP-UP CARDS CHALLENGE AT THE CUTTLEBUG SPOT


i started going back to the gym on monday, president's day, after been out for a month. it was not as bad as i thought it would be. wish me luck in staying put, lol.

i did not post yesterday the cuttlebug spot challenge post since i had the my pink stamper february design team project. 
this week's is a pop-up card challenge and after looking around the web for ideas, i decided to make what they called a 

Free Standing Pop-Up
5.5 inch tall when closed
you can find the instructions on how to make this beauty 
it will be better than me trying to explain it, lol.
i bet you will be happy to i sent you there.

 the paper is from dcwv, mi casa collection. such a pretty paper/cardstock.

the sentiment is a clear stamp from a my pink stamper stamps collection called

Faithful Sayings

the butterflies are really pretty. they cost me a dollar for a lot of them but can't remember where i got them :(

the corners were done with a fiskars corner punch, the ones that you twist. isn't that font on the sentiment gorgeous? and the sentiment itself? love it. all we can do is trust in the Lord. that is what i do anyway. :)

my other team mates have their projects up and nilda has them all together HERE for you to get inspired and play along in this weeks challenge.

go and have some fun. 
nilda also has a link up where you can find more tutorials for other types of pop-up cards. 
fun to make. 
love the interaction of these cards.

hugs to all of you!
*_*