Showing posts with label GRADUATION. Show all posts

Wednesday, May 20, 2015

YOU ARE INVITED TO A PIG-NIC...

haha!
i grabbed this file at the DIGIPLAYGROUND for today's post.
since i first saw it i wanted it so bad. i think is adorable.

may and june are full of graduation parties. i have a few to congratulate including my son.

and then i thought i will make this gable box and i will cut some duplicates of the animal and make my own invites or congratulation cards. i can also use it as it is: a treat box or maybe even for decoration.
and if i switch the inside i can use it for many more occasions. 

Graduation Party Invite and Gable Box
isn't she adorable?

i added the graduation cap/hat from a cricut cartridge.
 (NOTE: the cap does NOT come with the file)
-this is how the invite will look-
ooops! the eyes are upside down but if i do not tell, you wouldn't notice it.


-and this is the inside-

i used my die cutter (cricut explore) for the cutting and writing.

(the font is from the "all mixed up" cricut cart)

and i thought it would be funny to write
PIG-NIC 
instead
of
PICNIC
just to have some more fun


here you can see it attached to the box.

the final gable treat box measures around 
4-3/4" x 1"
the one i made is a bit taller because of the cap.

-i added some shimmer to the eyes and feet, and some color to her cheeks-
i think you will love this box.


-this is the file you will find at the digiplayground-

oh and they also have a cow,
maybe next project will be beefy, lol


and now as always, 

thank you so much for stopping by. 
i appreciate your visits and comments. 

did you know you can add your project photo to the digiplayground gallery?
check the "how to" here.


Wednesday, July 10, 2013

CONGRATULATIONS


i made this cute, easy and simple card for a graduation party we were invited to and i thought it was a nice card to share with you today. 

this is a squared card measuring approx 4" x 4.25".

Congratulations
for this card i used a bazzill black cardstock for my base (which i dry embossed) and a patterned paper from the echo park's collection scoot. 


 i also used a stamp from my mind's eye to stamp the faux stitching on two of the corners.

the stickers (congratulations and the grad hat) are from an old dcwv collection i still have in my stash, :)
the edging was done with an ek success paper punch.
 the school colors (from where this girl is graduating) are black and orange which i tried to incorporate with the stickers.


i normally do not do the inside anymore but since it is a grad card, i needed to finish it.
the sentiment is from a clear stamp. the stars look like the were punched and glued onto the pp but actually they are just the negative backed with cardstock, cool effect.
(oh, and the graphic pattern is the back side of the scoot paper i used on the front)


i hope today's project inspires you to use some of the older products you have in your stash. 

take care and have a great week.

Sunday, May 30, 2010

CUTE AND SOME SHOWCASE #9

Hello everyone, and welcome to Showcase $#9. 
This week is my turn at Audrey's
I have set a theme project for you that I hope you will all enjoy doing.  Using any color or medium you'd like, I would like for you to make a card which will include three (3) basic materials:  a stamp of your choice, a ribbon and a charm.  You can design the card however you like and use any other materials you'd like as long as the card has these 3 items.
Here is my sample theme project for you using the above mentioned 3 items:
 I used the stamp for the background, added the ribbon and a charm.
I know everyone is real busy and I wanted to make something simple but you can take it wherever you want.
Have fun!

Thursday, May 20, 2010

WILD CARD WITH LISA/GRADUATION

EDITED TO ADD

ANY SIMILARITY YOU SEE ON THIS CARD AND MY PINK STAMPERS CARD FROM THE NEW MINI MONSTERS CARTRIDGE IT IS JUST PURE COINCIDENCE. I COULDN'T BELIEVE IT!!! I JUST WENT TO HER SITE AND SAW THE WITCH'S HAT ON HER CARD (IT IS 5:10PM EST AND I POSTED MINE AROUND NOON TODAY) IT IS A MINI OF THE HAT ON FRONT OF HER CARD TOO...
THIS IS REALLY-REALLY SPOOKY.
OH MY!
I WILL HAVE TO EMAIL ROBYN AND/OR DIRECT HER TO MY BOG ASAP.

------------

HELLO TO ALL AND A BIG WELCOME TO MY NEW FRIENDS/FOLLOWERS
Feel at home and do not be afraid to comment. I would love to hear your thoughts about my projects.
 Well,
Today is Thursday and I have been busy getting some things in order and just now I finished the
Graduation card for today.
I did not like it they way it came out at first and after playing a bit with my brain
I came up with this one instead.

My Graduation Card
6 inches wide by 4-1/2 high
I used a regular standard card base just that the measurements are a bit odd, lol
The envelope is from page #35 using the blackout feature.
As you can see I made a mini card as an embellishment instead making the shaped card.
----

You still can open it as if you would with the original sample on the handbook :)
Can you see it on the photo? sorry but It is a bit hard to tell :(
---

I also used the Making Memories Scrapbook Stitches that is no other than floss thread, lol to make the tassel and added a rhinestone.
I also inked everything with black ink for definition.

---

This is the inside.
---

The supplies used are American Crafts textured cardstock, plain white cardstock from Walmart, patterned paper is from Colorbok (I found at Ross).

I hoe you like my variation here since sometimes is really not much you can do with some shaped cards.

---
Lisa's Card
(not avail yet)
---

Have a great Thursday and I think today is the day where Provo Craft will be annoucing (if not already) some of the new carts. I can't wait to see the whole handbook.
As I write this I haven't have the opportunity to go and check it out and still have other errands to do yet so I might have time after all of you are already drooled over them I hope they are worth it. So far from the sneak peak I like the Halloween and the Monster ones. I do not know if they released them today or not.
 Which ones you like best?

And,
Remember to click
HERE for the Chrip/ Shopping Bag giveaway

Thanks for visiting and feel at home.

Love you All
xoxo


Thursday, May 6, 2010

WILD CARD WITH LISA/#1

I made a mistake yesterday posting about the MPS designers and their projects being posted.
I apologize...I did receive an email with the changes and I over read it.
All our projects for the month will be up some time during May.

Now onto Wild Card with Lisa

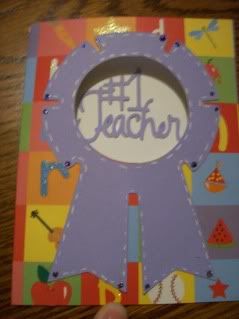
This is card # 38 and on the cartridge handbook you can find it on page #69.

My #1 Card
5.5 inches  
 I used Wausau linen cardstock for the base, DCWV for the front and the merit ribbon.

Another view.
(remember you can click on the photos for a larger vie
The stamped image and sentiment are from a clear stamp set
I have in my supplies but I forgot to write the name on the case :)
I cut a strip of the purple DCWV cardstock for the inside to add more purple to it.
You can see the envelope using the same cardstock from the merit ribbon on front.

A clear view of my stamped image tells you I need to practice stamping, lol.

Lisa's #1 Card
 Don't you love Lisa's colors today?I
I know I do.

Thanks so much for stopping by and I hope you join us again on Tuesday for card #39.
In the meantime feel to browse and if you have questions I can answer, do not hesitate to use the 

Tuesday, April 6, 2010

WILD CARD WITH LISA/WOW!

Hello everyone!

As I said on my post yesterday, today is  
Wild Card with Lisa.

We are showcasing today the 
Wow! card
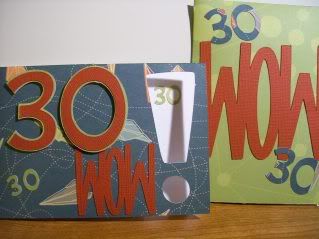
This card is #29 in our series and you can find it on page #60 of the cartridge booklet.

I had some notes on the Wild Card sizes and the envelope came out a bit bigger than the card. When making this card again, I will use the same size as the card for the proper fit envelope.

My Wow! Card
3.96 inches
I used three cartridges to make this Wild Card, lol. 

I used Wild Card of course :) for the card base, the exclamation point, the "you did it", the envelope and the envelope insert. Did you notice what a beautiful closure this envelope has?I really like that detail.
Then I used Graphically Speaking for the inside phrase: Who Cares? ( to crack a smile with the sentiment). And finally I used Winter Woodland for the two ovals where the "You did it" phrase sits on, lol. I used those ovals a lot don't I? I guess I really like them, but next time I promise I will use some other shape, lol.
I cut this card at 3.96 inches high and the envelope at 4.92 inches high and like I mentioned before, this size is too big for the card and I will make all the same size next time.
 Everything else is cut accordingly. No bling, no inks, no faux stitches...just a plain card. I had to fight myself to just make it this way because I love bling and inks, lol, but this time this is what I had in mind :) I hope you like it and it inspires you in some way.

Lisa's Wow! Card
If you want to know a bit of Lisa's Card story, 
please check out her BLOG

Thanks again for stopping by and for all the love you give me.

Enjoy!