Showing posts with label C- WILD CARD. Show all posts

Monday, December 4, 2017

IT'S BEEN A WHILE...

Hello all-
As we all know life keeps us busy.
Because all is good we are dealing with other health issues I don't care to discuss right now but is the reason why it took me a while to craft and post.

However, I am sharing with you today my 2017 Christmas Cards.
My inspiration was taken from Pinterest but I couldn't recreate the beauty of the original not that I ever want to. This is my take on it.

Christmas Cards
2017
4" Round Card
I used more than a few die cuts and took me a while to cut and build the prototype.

-Let's start with the Cricut images-
The circle base is from the Cricut cartridge 'Wild Card', Cricut Access #m2fa54.
The circles are from the 'Shapes' feature in Design Space. Cut at 4" and 3-3/4" also to get the ring around.

The candles are from the 'Christmas' cart, Cricut Access #m40ade.
Some of the foliage (green in this card) is from 'Storybook', Cricut Access #m34132 and the banner strips are from 'Bits and Pieces', Cricut Access #mfb1ff.

The font is called 'Wildflower'. I didn't know about it but it showed up in the fonts area and I was able to use it. I am assuming
it is a Free font or was Free at the time I used it.
I liked it very much and it wrote beautifully.

-The rest of the die cuts-
Cottage Cutz: wreath, tiny bow, and the neck applique.
Impression Obsession: the tiny red flowers (reminded me of poinsettias).
Martha Stewart paper punch: the red branch up on top.
Ek Success paper punch: the star on the foliage.

The embossing was done with a Tim Holtz embossing folder called 'Collage and Notebook'.
The sentiment is from Joy Clair stamps and it was embossed using a gold embossing powder, which it went array as I can see in the pics but not in real life, :). Oh well!

For those who are interested...here is the link for my inspiration. It takes you to the post itself.
As I mentioned before, I found it on Pinterest first.
-Absolutely Gorgeous- in my opinion, that is.
Hope you enjoy it and this blogger won't take offense I linked her project.

Before I finish here I am taking the moment to wish you all:
 'Happy Holidays', 'Merry Christmas' and or 'Happy Hannukah'
Better do it now in case life continues to surprise me and I can't come back for a bit.
*-*'

Take care you all!


Wednesday, March 9, 2016

FAIRIES DIGI STAMPS CHALLENGE

hello all,
welcome to our
today we are showcasing fairies.

Believe
(in magic)
is a card/tag mini set
she is absolutely gorgeous, isn't she?
-i used my cricut explore to draw and cut her-
she measures here approximately 2-1/2" tall but you can make it larger or smaller.

I used some alcohol markers for coloring and added some white polka dots with a gel pen and some gold glitter to the star on her magic wand.

the tiny flowers and leaves were cut with a thin die. the tag, card and envelope are from cricut cartridges.

i also applied a thin coat of wink of stella but for some reason it looks a bit muddy on the pic, :(

anyway, i am enjoying these challenges at cre8tive hands friends and michelle (the owner) is a darling. She has many plans for the immediate future. you might want to check her out and also join us in this challenge. 
you do not need one of her digis but she does offer some freebies if you are interested. she wants to make it easier for you to participate.
let's support her.

my final pic.

and a huge thank you for stopping by.

have a great weekend!

blogged
by
flowerdisco
(copyrighted)

Wednesday, February 18, 2015

JUST A NOTE

hello all, 
did you have fun last night with our ceo and team?
it was lots of fun trying to keep up. i failed. no way i was keeping up with all of it.

anyway, i am happy for us cricuteers explorer. our future looks so good.
and mr. ashish (cricut ceo) is one of the kind.
i think we all love him. he has been trying so hard to earn our hearts back and they way i see it, he is succeeding. 

anyway, with all the snow and pain here and there...the days just fly and i did not have anything done from the bits and pieces cart
 BUT...
i had found this free svg (they have other freebies) at a new site called digiplayground and i  had made this cute little box for valentines.
oh please, DO NOt type 
digital playground or it will take you to a porn site...it just happened to me, oh my!
the name is 
digiplayground....
(maybe they should think of another name because typing the wrong key can take you on that other site). lol.

.......and here is the candy box i used as a love post notes


FLIP OPEN CANDY BOX
digiplayground free svg
-thank you digiplayground for the freebie-

box: 3" x 8"
(re-sized)
 heart (outline) from george and basic shapes (M36415): 1" x 1.25" welded to love post from wild card (M34A03)

arrow from boho graphics (M33222): 2.4" x 1.7"

mini heart on arrow: 1.2" x 1.36"

---

 mini cards: 2.5" x 6" 
(scored and folded at 3")

mini cards hearts: 1.5" x 1.75"

just a note from wild card (M307F8): 1" x .9"


envelopes from smiley cards (M418E7): 5.66" x 4.2"

i think it turned out really cute. 
i had room for 6 mini cards and their envelopes for the size i chose.

i stamped the wavy postal lines on the envelope using a g-studio clear stamp i had on my stash. the mini heart was punched out.

NOTE: i tried to include all the number id's and where the cuts were from but some i can't remember. that is one thing i want to have on design space: the ability to find/see what cart was used after being added on the virtual mat and then be able to save all that info.
i do not know if they do have that option or not, but i can't find it.

you can make these darling boxes any way you want: any other size, colors, events and use them as desire.

also, 
digiplayground is having a dt call. 
go and check them out.

have a great week
and again, 
thanks for taking a peek.


Friday, April 5, 2013

HANG IN THERE...

sketchy friday....
will be skipping this week's challenge and it will resume on april 19th due to a 
SPRING BREAK!
however we have a new sketch for you to play and link your projects while we do what we need to do.
more info here. the sketch will be at the end of this post.

thank you to all of you who are supporting us in this endeavor,  for your understanding!
--thank you, thank you--

 here is a project using moses the monkey, one of the SK DIGIS.

Hang in There
(until we come back)
4 inches
this shaped card is the doilies one from the cricut cart named wild card

i fuzzed cut the monkey, added some glossy accents and some stickles after coloring him with my spectrum noirs. i think he came out pretty handsome, lol.


these papers are almost vintage, hehe...nah! but they are a few years old. they are from k&co and dcwv. the sentiment is from a retired set of my pink stamper. her stamps are coolectibles now and rare to find but i found out you still can find some here.

well, and this is it for now.. i hope you do not forget
 the sketchy friday challenge team,
be sure we will continue bringing your our best. anyway, if you follow me, you will see our come back, :D

until later!

and another big thank you for the visit,
you know how much i appreciate you stopping by.
xoxo


Sunday, January 27, 2013

A PUMPKIN SPICE BLOG CHALLENGE...oh happy day!

oh happy day, oh happy day!

this is my entry for this week's challenge at the pumpkin spice blog where we are asked to 
make something blue and white with something round.

Oh Happy Day!
round card
Supplies Used:
cardstock base: dcwv
birds: unity stamps (happyville)
clouds: fiskars punch
stickles: diamond
oh happy day!: whimsical designs stamps (whimsical fun vol. 1)
ink: versafine (onyx black)
blue brush marker: marvy uchida
red heart: my supplies (red polka paper-authentique)
cricut catridge: wild card (image #17)

why don't you join us, it is so much fun!
if interested in having some fun or to read the guidelines or because you want to see what others made, 

thanks so much for your visit, it means a lot.
flowerdiscosscraphut.blogspot.com


NOTES: i am also entering this card at the moxie fab challenge "make a card with a window". this challenge ends on feb 4th. 

Wednesday, June 20, 2012

PAPER DOLLS DRESS UP SERIES---episode 9

hello all

welcome again to another episode of the pddu series. today is episode #9 and i was assigned to work with page #65: pioneer girl.
i chose the basket---accesories1 using the shift button.

Sweet
4" round
i used the wild card cart for the base (my fav card shape from this cart) and for the scallop shapes and the circle.

this color combo is one of my favorites. 
that pretty cherry patterned paper is from crate: farmhouse collection. it is from a mini pad (6x6). the sweet sentiment on the tag is from a rub-on and the cherries were cut by hand from a sticker. the basket was cut at 1.75" and all edges were inked for more definition.

that strip of ric rac i found in my ribbon stash and as you can see i paper pierced the circle. the rest of the papers are from a k&co collection, maybe discontinued by now. i can't keep up with the latest collections :P but i find so many pretty papers in my stash. 

now onto my teammate projects.

sheena
http://lilflowerslynne1.blogspot.com/
ready for some gobble-gobble? no-no....eat chicken! hehe


kristie
http://just2ducky.blogspot.com/

look at the doll's face!!! wow!

dawn
http://craftycraftymom.blogspot.com/
awesome wagon!
 i have to make this at least once.

 hoping you enjoyed today's projects, i think they are so nice.

and...
thanks again for stopping by. 
remember you can always click on the pics to make them bigger and when you click on my teammate names, it will link you to their blogs.

well, this is it for now.

see you around!

DAILY LIFE: surgery went well, i still recovering but each day is better. :P thanks for the fast recovery thoughts.
-- i go today to the surgeon's appt for results on the surgery biopsy and upper gi. my incisions look nice but i look like i have been butchered at some point. i have scars all over my belly from my open heart surgery along with another one and now this one, :(

Friday, November 4, 2011

A LITTLE SOMETHING FOR YOU- GIFT/MONEY HOLDER CARD

did i tell you Lulu got sprayed by a skunk a couple of days back around 1:30AM? i did the tomato bath and i tell you,  it just masks the odor. she still smells around her neck and the laundry room is not the greatest place to be around right now, lol. today, she will get a bath with another homemade remedy i found on the net. let's see! and wish us luck :P
we all can write a book with anecdotes and it would fit between drama and comedy and some action with violence, parental control advice. perhaps, we can have our own reality tv show. :P
i bet we do, right?

anyway, here is a card i made

a little something for you
5 inch
(no skunk involved, i promise)
just a gift/money holder card
--LOL--
 the santa's hat is from winter woodland cricut cartridge and the cute sentiment from my pink stamper set called: winter treats & sayings.
 (the inspiration came from here)

the star brad acts as a hinge and connects the front and back.

when you cut the hat it already gives you a slit---the dollar sign is to show you where the gift card or money will go: is from the wild card cart. i added some green stickles for the bling in money...hehe

i cut this hat 4 times: 3 times in the red patterned paper and one time on the beige color. the fuzzy thread was added with double sided tape.

 this circle was added to hide the brad prongs.

 envelope made using the new arrival cart. 
the "from and to" are also from a my pink stamper clear stamp set.

 we are going to need lots of these gift card/money holders for the upcoming holidays. 
i wanted to share this one idea and how you can make it your own,  from many others in the web.

have a great one!


Monday, May 16, 2011

WITH SYMPATHY CARD

hello to all
:)
i am back but still not settled yet. i do apologize for not being around but you must know family will always come first, especially here at my household. plus, i have been in so much pain from trying to do the extra bit--  :(

anyhow, i had to work on something before i go nuts, lol and i made this sympathy card and i also made a super easy and pretty (i believe) gift card holder i needed. 
i then had to buy one because i forgot it at home--grr!

first,
With Sympathy
 4.25" x 5.5"
 purple is a very hard color to photograph especially if you do not have good lighting. a friend told me she photographs hers with low lighting but it did not work for me. i googled it and it says to use the "white balance" in your camera. this is what i used to avoid the bluish color i always get. it is not perfect but is better. i still have to work on it. i have a cannon ps s2. it is an old camera but it has been very good to me except with the "color purple", lol.


the image is from cindy loo cut at 4.25" high and all its layers.


the sentiment is from one of the latest releases of my pink stamper clear stamp set called spectacular sayings. i heat embossed it. i still have to work on my heat embossing too :P--- but this font is so pretty tough. ;p


i made this yellow crinkled ribbon out of a strip of yellow cardstock. it looks like fabric, right? :) and it does in real life too--hehe. loving it!!!!!
i did not have any yellow ribbon left so i decided to improvise. i wet it and crunched it and dried it with the heat tool, then i glue-gunned it on the back to keep the pleats. so easy a cave woman (me) can do it, lol.
  
the mini butterfly is a sticker from my stash.

---remember you can click on the pics for a larger view---

now, this is the gift card/money holder card. the other "super easy" project that i forgot at home. :) i told the bride i will mail it but do not expect more money--hehe--because the money went in the other one already, lol.


the inside is just the holder that i paper punched it.
the envelope i made from a 12x12 sheet of vellum using one of the envelopes from the wild card cart--for the adhesive i used a 1/8th wide scor-tape i have. it worked good. you still can see it through but it does not look bad.

well, hope you get some ideas with these projects.

and i hope to come back soon....in the meantime, know i still love you all and please forgive me for not visiting your blogs lately. i am hoping all will settle/come down after graduation and the move to college.

i am also dealing with my husband diabetes being totally out of control: 400+

no more pity party---i really hate it!!!!--but i feel you guys need to know why i am not around---i have a lot on my plate and because this stupid pain never goes away--it is really hard for me to even try to balance it all. i just can't.

see you later and

BIG HUGS to all----!!!!!!!

Sunday, February 20, 2011

THINKING OF YOU


HOLA 

i have been sewing patches for the high school play-- a bit here and a bit there-- and after i did a few per day i was good for nothing, lol.

but to take my mind away from them ;p, i started working on this set of cards. i made two sets of 6. you will see just one because they are twins, not identical tough :). i am giving one set to my next door neighbor and the other set is for Etsy.
i really do not mind sewing, i love to sew but because everything hurts is not as much fun as it used to be, ;p

Thinking of You
5.50 inch tall
 the card base is from a child's year, image# 15 of the overlay using the card feature.

all the embossing was done using my dear cuttlebug  and a folder called textile from pc too.
(did you know i own the sizzix pink big shot too but still like my cuttlebug much better? wink-wink)

for the base and for the envelope  i used kraft cardstock. i cut the base at 5.5 inch and the patterned papers at .25 inch smaller ---5.25, 5.0. 4.75.

i did not have enough of the patterned paper for the six cards but very similar one from the same collection. this photo shows one design and...
this photo below the other design.
 almost identical--hehe

the yellow strip was made using an older fiskars punch and the flowers are from accent essentials.
the kraft one is image# 46, the greenish one is image#26, and the orange one is image#23.

my son hates those gems i use but i like them, lol.

below is the envelope and it is from wild card cart-- image#2 using shift and it measures on my gypsy
width of 10.57 and a high of 5.85.

hope you like them.

-------

this tuesday we have my pink stamper design team projects and the cuttlebug spot challenge. i will be posting the cuttlebug challenge on wednesday.

-----
thank again for stopping by!
i love you all.
*_*

Monday, January 24, 2011

HAPPY BIRD-DAY TO ROBYN---MY PINK STAMPER--


today is Robyn's birthday and we, her designers, made some birthday cards for her and we are showing them on our blogs. i forgot to send mine out with everything going on, but she will "belated" get it, lol.
Happy Bird-day
6.50 x 7.25
the other day robyn made a tall card -click on "tall card" to see it--and it was my inspiration for this one.
this card base is from wild card--image #12 and using the hide contour to hide the oval window in the original.
i tried to use robyn's favorite colors (pink, green and brown) but missed on the brown ;p..i used a yellow ribbon instead to match the bird's beak and legs.

 the ribbon slide, image #44 using the decor tag feature, is from from gypsy wanderings---which i tend to forget about it and i just realized it has many basics shapes like george does too--.
the scalloped heart, image#18 is from the same gypsy wanderings, and the other two hearts from gypsy font.

the sentiment is from robyn's stamps, of course--- i wouldn't dare use any other for her birthday :) plus i really like her stamps a lot. you can find it on the tweetie hoo puns set (you can click on the pic or the name if you wish to see more of her stamps/products)

 TWEETIE HOO PUNS


the cute bird---my favorite-- is from create a critter--image #42.


i used some bling robyn had send me with some stamps.

this is the inside---the sentiment is a group of  three "tweetie hoo puns" stamps

if you have time please stop by Robyn aka My Pink Stamper and wish her a happy birthday-- she is an awesome friend and human being and i wish her the best not just on her birthday but everyday.

happy bird-day to you my dear robyn!!!

and thank you my friends for all the support and love you give me...
love you all
*_*

Tuesday, June 22, 2010

WILD CARD WITH LISA GRAND FINALE/ENVELOPE

Dear followers, friends, bloggers and all who stop by to my work...
I started the Wild Card Series with Lisa back on January 1st, 2010 with the Scallop Card.
Lisa contacted me after I made a comment on her blog asking if we can do a series together and that is how all started. Lisa couldn't finish all the cards because personal reasons but we together did most of them, one by one.
I contacted Lisa last week for the Finale of the series to see if she was up to one more but she is not going to be able to. I was looking forward to her response because I think it would have been nice if she could have joined me on this last one, which happens to be the envelopes but this would have given us a free will to make any card we wanted.

At the end of this month my term with Robyn aka My Pink Stamper as one of her designers,
will come to an end.
It was my first Designer Team experience and I learned a lot from it and I am very grateful to Robyn for giving me the opportunity to be one of the first ones on her first Design Team. It was an honor and I had lots of fun. Check the above MPS link to know the requirements to apply to be an MPS designer.
Good Luck and have fun.

So...I am done with the Wild Card series and done with Robyn almost at the same time. Ironic? or Coincidence? or a new window of opportunities? I do not know. I take one day at a time. I still have some projects to do as a MPSDT designer and then I will hopefully have a bit of extra time for my blog and maybe do some fun things with you guys. Let's see!

Now...I will introduce my last card and envelope from the Wild Card cartridge Series...
#50.... 
YAY!!!.

My Envelope
9.25W by 6-1/8"H
and the card I made for the envelope.
I used a Martha Stewart punch for the envelope. 
It is a big envelope...It needed to be big for the Grand Finale, LOL.
I used  the same paper I used for the card background. 

********
My Card
8-3/4W by 6"H
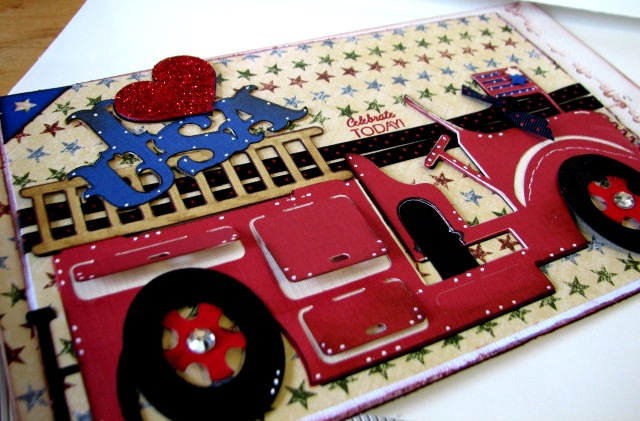
 The fire truck is from the Independence Day Summer Collection seasonal cartridge and using my Gypsy and Expression I cut it at 4.50"H by 8.75"W and the layer came out to be 4.5"H by 8.44"W. I welded the I heart USA onto the ladder and I used very fine glitter to cover the heart. I also draw some doodles dots.That little blue star you see on the flag it was not supposed to be there...it is from when I did the corners and I punched it with a star punch. I did not realized when I took the photos it was there, lol.

On this photo you can see the small compartments on the fire truck opening up and you also can see the tires centers had been popped-up and a rhinestone added. You also can see an MPS clear stamp "Celebrate Today" from the Sweet Occasions set stamped with a Colorbox pigment ink. The card base is no other than a white textured American Crafts cardstock. the edges have been distressed on it and inked as I inked the truck too.

This word is from the same Independence Seasonal cart and I made a shadow layer in red but it's hard to see. The cart does not have a layer for this word. I cut this at 1.75"H and the width came out to be 4.41". I had to play a bit with it to get the shadow the right size. 


I hope you enjoyed our series and like I said I am planning to do some fun things with you/for you guys.

Thanks for being there with me all the way and I know I inspired some of you because I read all of your  comments and that does makes me happy.

XOXO 
to all.

NOTE: I joined the Cricut Circle (Agnes is covering her ears, lol)


Thursday, June 17, 2010

WILD CARD WITH LISA/GIFT BOX

Hello everyone!

I want to take a moment here and acknowledge all my new friends/followers. I am so happy you guys are here and I hope I do not disappoint you with my work.
I am no pro but I do try my darn best to do a fine job here. So with that said, feel at home and know you have more than a blogger here... you can find a friend in me too.

Hugs and a BIG WELCOME to all.

Today we have the Gift Box, #49 in our series and you can find it on page #80 of the handbook.

My Gift Box
7 inches
(I believe this is a max size on a 12 by 12 mat)
 This is my take on it. I know other crafters use a clear sheet to cover the front and they put candies/cookies in it but because I like to make boxed card sets this is what I made.
I used the Tim Coffey designer paper from K&Company and for the solid paper I used My Minds Eye.
This squared box at 7 inches ends up to be a 4.5 by 4.5 inch box. I hand cut the flower on the front from the same designer paper and I was going to do more to it but time did not allow it. I will make a better flower when time permits and then I will edit this post.

This is another view of the box.

These are the cards I made and to be truthful I used the Gypsy to cut the same cut that the gift box has on the front and I couldn't decide where and what size I wanted it so I opted for this one and just leave it simple because the paper is so awesome. (It took me a while and lots of scrap paper trying to make my mind, lmbo) Oh! and this paper/cardstock is from The Rockstar stack from DCWV because I did not want to keep using the beautiful paper from K&Co (shame on me, lol) but this DCWV paper/cardstock is as beautiful as the K one and it did hurt to use it too :D

I made 6 cards (2 of each) with their handmade envelopes. 
The sentiments are stamped from different clear stamps from my stash.
The cards are 4.25 squared and the paper is 4 inch squared too. I inked all of it too.
I will give you the measurements for these envelopes. I used my Martha Stewart score board. 
DIRECTIONS TO MAKE YOUR HANDMADE ENVELOPES
FOR A 4.25 INCH SQUARED CARDS.
---You need a 6-7/8 inches squared piece of paper (I used a printer/copy paper for these a bit thicker than the usual one).
---Align that piece of paper at the 6-1/2 inch score line on your score board and then score on the 4-1/4 inch marks on all sides. 
---Fold on the scored lines and Voila...you have a handmade envelope for your 4.25 inch squared cards. You can lined them up if you want.
***********************************

This is a view of the how it looks in the inside: cards and envelopes together.

I hope you enjoy this Gift Box from the Wild Card Cricut cartridge.

One more project from the series and I can't believe I will be done.
It is not easy to do the whole cart. 
It gets to you after a while :)

********************************

On another note I would love if you have the time and stop at 
Mrs. Donna Mundinger's 
 and take a look at the Shower card she made. Donna says I inspired her and that is a major honor to me because when you see Donna's work you are the one who will be inspired and amazed at her creativity. Please, do not be shy and go there and see it for yourself. You will be glad you did if you didn't already, that is :D
******************************
More hugs and love to all and 
Thanks for stopping by my friends.