Showing posts with label HANDMADE PAPER FLOWERS. Show all posts

Wednesday, March 30, 2016

A CHICK'S HELLO!

Hello all!
Agnes here today happy to share another project I made using the so very beautiful Curious Metallic Cardstock from Cut Cardstock.
This time I am using botanic (green), the cognac (brown), the white gold and the mandarin (orange). These cardstock are 111# except white gold being a 92#.
I also used the 130# Classic Crest Recycled White, not from Curious Metallic, but I chose it because its thickness was perfect for my card base. The layers on this card needed some good support and therefor it came in very handy. I might use it for some mini albums and or tags in future projects.
My two favorite cardstock colors on this card ended up being the botanic and the white gold. More about them later on.

Below is a pic of Cricut Design Space virtual mat of some of the images used and a few+ words about my process making this cute card.

Sometimes I do not use all images I cut or follow the plan as you will see in a moment.

This time I ended up just using two of the chicks and some of the flowers but not those exact leaves. 
The chicks were cut using white gold which is like a frozen white kind of winter wonderland with a soft hint of gold....simply beautiful but, I wanted my chicks in yellow. I had seen Amber do something similar here, where she used ink to color her bunnies. I chose a dye ink for mine and I have to say I was a bit apprehensive I would take the fabulous glitz away but it was time to experiment and so I did with great results. The beauty of the white gold was accentuated even more. I love how it shines throughout and made my chicks stood out even more. 
I decided to ink some flowers too in pretty soft pink with the same results and then I decided to embossed the coppery cognac with a Cuttlebug folder. Again, with awesome results. This time the copper color in cognac shows magnificently on the embossing. 

 Know white gold is not the only exquisite color in this collection. Check these leaves out. Check the before and after shaping. Awesome. Botanic looks so velvety and soft and so pretty. Shame on me for not using those leaves but I am showing them anyway because they deserve it well. I love the orange too but as I previously stated, on this card I am more in love with botanic and white gold.

I achieved that dimension and texture by gently pressing and circling around them with a stylus, shaping as needed. 
I was almost done adhering all layers with trusty Tombo when I realized my chicks were almost eye-less, lol. I grabbed this Sakura pen and voila, my chicks were eye-less no more.
After changing a few things around and adding a drop of liquid pearls to the flowers centers and adding the tiny leaves instead the larger ones, I am finally able to show you the finished card.

I love the shimmer you can't see, but you have to believe me when I say it is stunning.
I hope you like the composition as well.
You could adapt this card for any other occasion or simply use it as an embellishment on a scrapbook page or re-size it to a bigger size and hang it on a wall or frame it if you want too. The possibilities are endless. Make it yours!

Well, time to go...thank you so much for your time.
                               Hope you enjoy today's post and smiled at least once.

                                                  Have a great Easter!

Cut Cardstock supplies used in this project:
Curious Metallic BotanicCurious Metallic Cognac Curious Metallic Mandarin


Neenah classic Crest Recycled 100 Bright White Mono Multi-Purpose Liquid GlueGloss Black

Warning: This Curious Metallic Cardstock will mesmerize you with its shimmer. It will be love at first sight.
You have to see it to believe it. (wink-wink) 
Please know these pics do not do justice to the real colors on this collection. 

Wednesday, May 13, 2015

A HINGED GIFT CARD BOX

after a few days of having the slideshow tut on the digiplayground blog, i thought it was time to show some pics of the finished project here in my blog.

i am in love with this flower. 
i think it turned out awesome!


the hinged gift box is very unique and easy to cut and assemble.


-below a few more pics of the leaves and petals-
(you can click on pics to zoom in)


i used susan's garden tools from sizzix but any big ball stylus will help you to break up those paper fibers to manipulate the petals and leaves. 


you can still watch the tut here if you want.

thanks for stopping by and 
hope you all had a happy mother's day!
we ended up eating burgers from 5 guys, yummy!


Saturday, May 9, 2015

A "HOW TO" TUTORIAL OF A HINGED GIFT CARD BOX

happy mother's day to all parents.
wishing you a fabulous day/weekend!

-this is just a sneak peek-
of a sweet and short slideshow tutorial

on the how to make this box

can be found at the 

thanks for stopping by and have fun!


Saturday, April 18, 2015

FLORAL DOILIES WRAP CARD

hello bloggers,
here i am sharing another project using one of miss samantha walker's svg's cutting files. this time i chose this beautiful intricate floral design wrap card.
of course you can use it anyway you want: think invitations, weddings, mother's day, home decor, photo keepsake and so on and on and on.

Floral Card Wrap
-i am using mine as a mother's day card-
6 inches square
i used some k&co double sided paper for this awesome card.

what a beautiful design, huh? it looks great and so feminine and gentle.

i uploaded it to my cricut design space to cut. it took a while because the explore goes a bit slow on intricate cuts but the wait was so worth it.
this floral card wrap is available in different formats to use with different die cutters software.

the pretty flower is a spiral flower from the flower shoppe cricut cart. it was cut at 5 inches and when made is about  1-3/4" in diameter. just something to think about it when sizing them.

below is a collage of the card from different angles.
you can always click on pics to zoom in.
 i love the colors of that k&co cardstock.

next time i am grabbing a few other of these intricate cards i seem to be loving these days.

the card is linked to the digiplayground store in case you want to take a look.
again,
thanks so much for stopping by.
i appreciate your comments and visits and if there are any questions you might have about crafting this beauty, ask away.


have a great week!


Thursday, April 16, 2015

THE CHECKBOOK THAT IS NOT

excuse the non- spring colors but i had the itch to use these old collection from teresa collins: far & away.
 i do not know why but i am very attracted to traveling papers and stuff, especially if they are vintage looking not that this one is specifically vintage looking, lol.

let's start with
"Favorite Voyage"
is the name of my project.
(did not intend to rhyme, lol)

(the checkbook that is not, but it can be and also it can be a mini album, a gift card, money holder, photo holder, tickets, passports... and anything else you want it to be.)
i cut this one at
6-1/2" wide x 3" tall

anyway, i grabbed a checkbook svg from the digiplayground designed by miss samantha walker, that i have been meaning to make to keep in my purse for all the bb&b coupons and lists i have in this ugly and torn envelope that needed to be replaced like ten years ago. another mouthful, huh?
(just kidding on the 10 yrs)

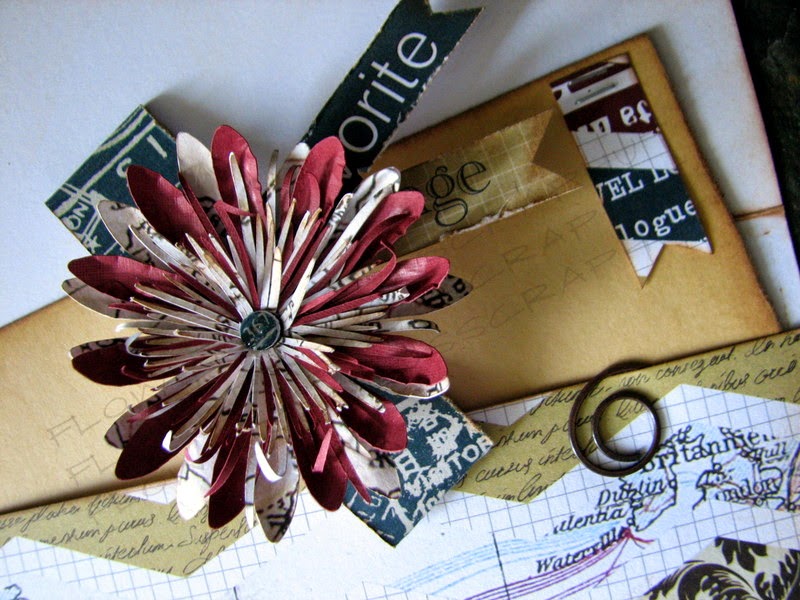
the pic below shows the inside, the closure band with the flower, the old vintage wanna be antiqued cardstock, the small banner that is attached with the tiny stapler and the curly metal embellishment clip i had in my stash forever. hehe.
  i added two more hand cut banner strips that read "favorite voyage" to add to the flower. they are also from the same tc collection.

now about the flower.
i also grabbed it at the digiplayground and is called "bractless mentzelia"
what a beautiful flower. it is supposed to look like this:

and like this in real life:
(photo courtesy of dave's garden)


i made mine with a totally different look which i think is really pretty too.
(i bought the susan's garden flower tool kit not too long ago and i really love two of the tools and the foam mats).

i used some of susan's tools to shape miss jamie cripps bractless mentzelia svg flower below. you can also use a big ball stylus which i happened to have too from another set or anything else you have on hand to shape any paper flower and or leaves.


i added a bit of glossy accents to the center of the flower
(hardly noticeable but is there)


last pics for you to take a closer look to the edges of the petals, how they shaped,
so cute. that was done with one of the tools i liked the most from the kit.
also, a look of the front flap.

of course i inked all the cardstock edges and distressed some.

what do you think? do you like it?

both projects were really easy to make and of course i used my cricut design space software along with my cricut explore die cutting machine for the making of this project but they are available in other formats for other die cutters.

so easy to make!

hope you enjoyed my post for today and as always
thanks for stopping by.

have a great weekend!

Wednesday, March 11, 2015

CHINESE LANTERN NUMBER ONE

i had fun making this cute and fun
dimensional chinese lantern.

i want to make two more and i will post them as soon as i am done with them.

this is my first one.
i do not know what it says, i hope is not a bad word, lol
if you know the meaning, can you please tell me?
i found the lanterns in the cricut design space. the lanterns are digital images: no physical cartridge that i know of. i am sure you can also find them in the cricut craft room.

the completed project size is:
 5"tall and about 3-3/4"wide
the flowers i had made a while back an are from the flower shoppe cricut cartridge an the leaves are from a tim holtz decorative die: autumn gatherings

the lanterns and or the flowers are not hard to put together but it you take your time before gluing, the better.
hehe, experience speaking here.
the dry embossing was done with a darice folder: basket weave. i think is so pretty.

-below
is the pic of the hanging piece (grey/gray color) if you do hang them-
i made them a little too long, i know...so take that in account, :)

that grey/gray part goes inside the top opening. for a while i was trying to wrap it around it, lol. i even cut another piece thinking i had messed up the size, duh! then i realized what i was doing wrong.
ETA: 3/20/15--- the grey/gray part it is supposed to go on the outside and not in. i was looking at some other lanterns yesterday and realized this :( sorry.
-if i hang them outdoors, i will use twine/jute/ribbon instead. this i used here was a strip of cardstock-

cricut has many different lantern styles an they are all pretty.
hope you try them.

ok, fellows
this is it for now.
life is going faster than needed.

did i tell you son is graduating this may? i think i did and...
he is graduating with honors: cum laude
-we were just informed-

yay! we are so happy for him. he has been a great kid all his life.
not one headache or worry from him, ever.
he deserves this and more and i praise god for keeping him out of harm ways.

graduating with a major on computer sciences and a minor on graphic designs
from boston university it has not been easy but it has paid off.

mmm, i wonder if boston will still have snow on the ground when we get there in may. there is so much to melt, it has been a disaster for them this winter. so sad.
and the freezing cold, brrr!

anyway,
see you later
signed by a proud mamma
*-*

have a happy and blessed day
and
thanks for stopping by!


ETA ON 3/12/2015


credit to
tattoos time


Wednesday, July 9, 2014

A LUNCH BAG

hello all...
i am starting this post with...
NANI KE OLA
is having a design team call.

click HERE to read how to apply.
have fun!  and good luck!

 and... with the good news come bad news too since  i am almost at the end of my fantastic time with nani ke ola. i am going to miss this group so much.

But... this week i will be visiting my son (anD that will made the bad news feel better, hehe).
 i am giving my son this cute lunch bag i filled with dollar bills. yeap, all ones, lol.
i think he will have good laugh when he opens it.  he is in college so every little bit helps, right?
( after i closed it i realized i could have taken a pic of all the dollars, lol, sorry) did not want to open it again and mess it up, you know that happens, right? :D

-here is my project-
Love
BY FLOWERDISCO FOR NANIKEOLA (4)
this paper i used is from glitz, from the finley collection and is an ombre style as you can see the color green fading away.
---
BY FLOWERDISCO FOR NANIKEOLA (3)
i did some dry embossing with my cuttlebug and some tim holtz embossing folder and added some splashes with a dollar stamp using the newer prima chalked ink edgers. i used the color called "old road". i love how it inks too.
---
BY FLOWERDISCO FOR NANIKEOLA (2)
i also used some patterned paper from elles' studio to punch out the scalloped circle that is part of my flower. i added a green ombre circle and another circle from the cold country collection. it has an angel in the background and reads "love". that is why i tittle my dollar bills lunch bag LOVE, hehe.
---
BY FLOWERDISCO FOR NANIKEOLA (1)
and i finished the lunch bag with a rustic jute twine.
hope you enjoy my project for today.
thanks so much for stopping by
and,
do not forget to check out the DT CALL from nani ke ola.
have a great week!

Wednesday, June 5, 2013

A VINTAGE CHALLENGE...this time using a balsa box

welcome 
this week we are going vintage, wohoo!
i love vintage but i was so freaking stressed out about this project wanting to come out at least decent since i haven't go vintage in a long while, :P

i used this balsa box i received along other goodies from a dear friend and did my best to make it look vintage.
i think these boxes are sold at michaels'.

our sponsor this week is
"Scrapping Memories" 
and they are offering 5 free files of winner's choice
Cool!

anyhow here is my project,

Postcards
vintage look balsa box
this is my first cluster of flowers...at least i do not remember making anything like it, hehe. these flowers are all beautiful but i am in love with the callas (the little pinky ones). i even added a stickpin from webster pages i had in my stash.
the sentiment (xoxo tag) is from a stamp. i almost forgot about adding it. crazy days!

the paper is from recollections. the metal tag, the leather postcard strip and the key are all vintage in my craftroom, lol. i had them since the beginning of my paper crafts adventure and i remember i was then in love with all vintage and travel stuff, hehe, but never used. 
does it sounds familiar? 
anyone? 
*-*'

i painted the balsa box black first (so if i missed a spot when applying the patterned paper it wouldn't show up much)  and used modge podge to adhere the paper and then i used my glue gun for the rest. i had to watch some you tube videos to inspire me, not that i could even get close to all the work involved in altering these cute boxes.

at the end, i am pleased with what i came up with...not bad at all, if you asked me.
i give kuddos to these ladies who make all kind of projects like this because it does takes patience and time. i guess i won't be freaking out next time i work on anything like this...the more you do something the better you get at it...and that goes for everything out there, right?

psss...did you know the knob is screwed in? i learned that in a video. hehe...i had painted it over while in the box but taking it apart was so much easier, wink!


 and this is it for today...
as always i
thank you for stopping by!


Wednesday, May 29, 2013

A PUMPKIN SPICE PROJECT...using a die cut negative

hello all,
today is my turn to post at the 
pumpkin spice
and
you all know i love making cards and while in need of another sympathy card, here is what  made. 

Comfort
5" square card
looking what papers would look nice on my sympathy card i found the stella rose 6 x 6 pad from my mind's eye and i had forgotten how beautiful they are. i chose a few of them for my card and they are all here for your to enjoy!


 some machine stitching and some pretty flowers along with a paper border complete this easy and pretty to make handmade card.
i used the cricut cartridge cindy loo for the word comfort and i used the negative of it in my card.
i hope you like it!

Have a Beautiful Day!

Sunday, May 26, 2013

U R THESE AND MORE...a viewfinder image from the cutting cafe

this is one of the newest and cutest (if possible) sets from the cutting cafe.
---a viewfinder--- 
I have seen them around a lot lately, so many uses and so much fun.

i used the pdf file and again i cut it by hand. it was really easy to do since the cuts are so simple.
i love that regina made the black reel too and if you want you can add a brad in the center and have it rotate...how much fun is that? a lot! :)

here i used one of the phrases and i manipulated within the document to use the part i needed and made a small banner tag with it.

what a beauty!
i love the colors i chose. the patterned paper is from an older basic gray and the pink is from an older single sheet from ki i had collected. it was a double sided one and i chose it because the other side was green for my leaves.  the flower is from the flower shoppe cricut cartridge and my first time using it.

here are all the file details:


This VIEW FINDER REEL FUN SET features the following:
4 assorted reels: UR, BIRTHDAY, KEEP CALM and HAVE A GREAT SUMMER
1 Reel template - this template comes in PDF, SVG, MTC and WPC format.
1 shaped card - this template comes in PDF, SVG, MTC and WPC format.
2 different reel envelopes (one plain one and one with a hole in the middle) - these template comes in PDF, SVG, MTC and WPC format.
7 envelope labels - tags
2 misc reel images.
All of the images come in PDF and JPEG format.

don't you want to stop by the cutting cafe and see what else is there for your enjoyment?
here is the link to the blog and from there you can stop by the shop if you want.
 have fun!

also, thank you so much for visiting!

Friday, March 29, 2013

WELCOME TO ANOTHER SKETCHY FRIDAY

i am not saying much today other that if you haven't check sketchy friday yet, what are you waiting for? :D

don't have any digital image???...please-please...get one here, even is not mandatory to use one of ours, but if you do....... the prize doubles.

anyhow, let me show you the big-big tag i made for today's challenge 

My Sweet One
4.50"
so cute!

this is the sketch for this friday
pretty close, right?

a few more pics...
used the spectrum noirs for the coloring, a bit of dry embossing and i stamped a subtle red background on beige zig zag circle. 

(all patterned papers i used on this project are from traditions: a carta bella collection)


 and this is the so adorable digital giraffe i used.
---pretty-pretty-pretty---

come on over and play with us....you have nothing to loose and a few awesome digis to win

if you take my invite, please click here for the few guidelines we all need to follow.
thanks so much for stopping by!

--take care--