Showing posts with label DIY. Show all posts

Sunday, March 4, 2012

HANDMADE---super easy to make pet collar/necklace

every month a make for miss lulu an accent pet collar, beaded necklace or a flower.

all i used here was a piece of ribbon-----measure your pet's neck and add a few more inches for the knot and because you do not want to strangle your pet, lol, but you do not want it too loose it can get stuck on things----
disclaimer: use your common sense and of course i am not responsible for any damage to your ribbons, flowers and/or pet-:-)

i have these prima old flowers i normally use on her necklaces and i attach them with a craft glue dot. on this case i even added a brad after cutting the prongs, i do not want miss lulu to get a sore if the brad rubs against her skin--;p and voila! you have make a trendy collar/necklace for your pet.

miss lulu loves them, she loves to be stylish--hehe

i just wanted to share this with you all. :P

on another page.....

this coming week i will upload another digital layout, using the awesome My Memories software.
---the more i play with it, the more i like it---. 
and, the other night i went to their site and grabbed almost all the freebies they have. 
 yes, they have lots of them and 99 cents kits you can grab too.

NOTE THE GIVEAWAY REQUIREMENTS:
after i upload the layout, you have to go to their website, check it out and come back and let me know which one of the freebies you liked the most and i will pick a winner who will receive a code to acquire their own software value at 39.97 USD and you too can start with the freebies included plus grab the freebies on their site. you can also make cards, albums, home decor and so much more with this software from


they also have...
 lots of tutorial, an awesome blog and, if you are business like, you can try and make some money when somebody you refer, purchase this software.


hope you had a great weekend.
----thanks for stopping by----

Saturday, February 11, 2012

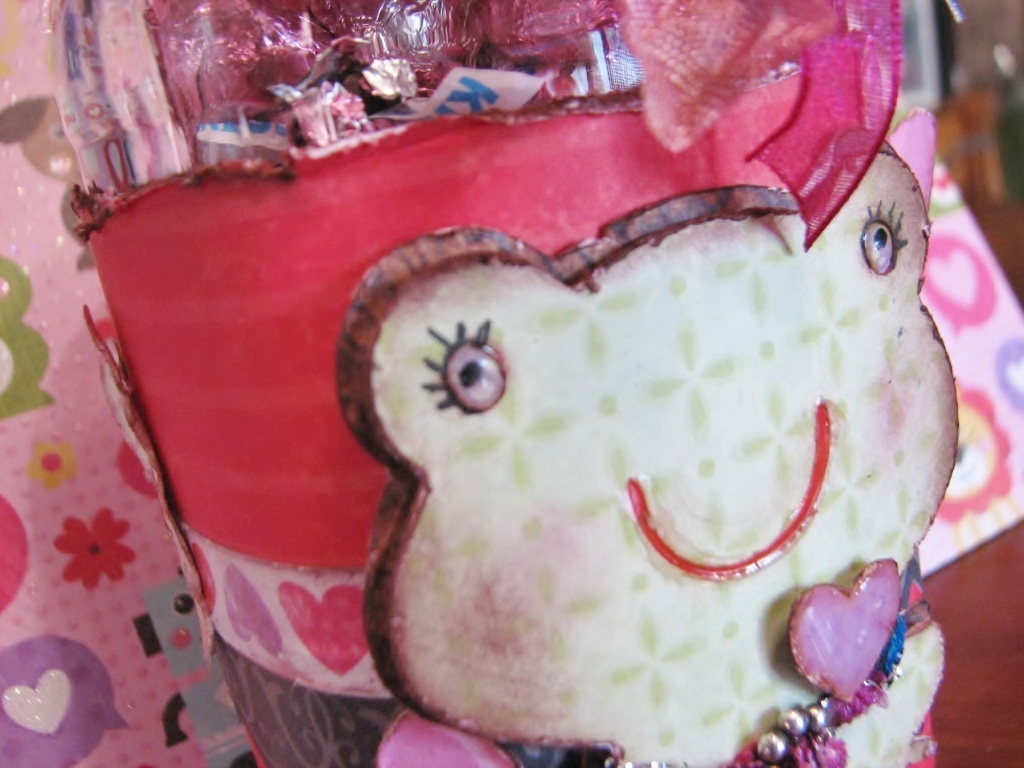
KISS JAR---altered pantry jar

hello all,
we got some light snow in since yesterday. my backyard looks like like a winter wonderland. i love when is fresh snow on the tree branches.

i  had time to made this jar i had in my pantry waiting for a nice occasion. i bet you already notice i like to alter items and i also like to repurpose.

Kiss Jar

---sorry about these pictures. my computer is sick. (i dropped an iris case on the keyboard and i think it damaged the hard drive. i am using my husband's but it does not have the same photo editing program i have in mine. when i get tim,e i will see if i can download it for free--i like that program better than this one).
---the frog is from create a critter, page #24---image #1 on the overlay.---

 the red paper, hearts and one of the borders are from k&co. the scalloped brown border is from crate paper.
this super cute necklace was made with a beautiful ribbon a blogger sister gave me a while ago. the chrome flower is a piece of jewelry. her nails, heart, eyes and lips were accented with glossy accents.
and i draw some eyelashes for winking..lol.
different strands of ribbon for the jar neck with a heart charm attached to them.
i finished my jar with hershey kisses---my favorite chocolate--and i have tried many, hehe.

note: 

my husband's b-day was on thursday. i made a special dinner for him. i went to the fish market i got some whole red snapper to bake. i also made mashed potatoes mixed with sauteed onions and a side of grilled asparagus---YUMMY!---what a delicious meal. i also got some clams. we ate those on friday. this jar was for him too---along with his birthday gifts and, of course, we are sharing the candy---wink!

take care for now and have a great weekend!
---still loving you all---


Tuesday, February 7, 2012

A VALENTINE’S CARD with a handmade background

hello to all who still visiting my blog.
I have made a background for this my card and since normally I used already patterned paper, I though to practice with something “out of the box”.
My Valentine
VALENTINE CARD 008

VALENTINE CARD 010   the size of this card is the standard A2 or 4.25” by 5.5”.
I used a fiskars clear background stamp called “vintage farmhouse” and a a wooden one for the script called “italian poetry” from hero arts. these stamps have been with me for a long while and I do not know if you can find them in the stores.
anyhow, I used some acrylic ink from pebbles and brushed it on the vintage farmhouse. I then inked my italian poetry with a staz on black ink pad--- and what you see is what I got---not bad at all.
not my usual colors but I like how it turned out.
the border strip, the scalloped circle, and the plain circle are from my fiskars punches. the little heart and tag are from a new k&co die cut assortment I just got at michael’s. the leaves I had them from some cricut cut and the stamped sentiments from g-studio dollar stamps.
I hope you like it and get inspire to make your own background for you project.
thanks for stopping by!
note: I have been feeling better. all my tests came back good and that is including my stress test. when the office called me to let me know I told them because the tests were coming back good it did not mean I magically got better. I then told them if it was not my heart, must be my lungs then. the doctor prescribed an inhaler for asthma and I think is doing the trick. I am hardly out of breath despite today it just has been 4 days since I started it. I had my heart surgery way back on 2007 and since then I have been suffering from this shortness of breath/fast heart beats and until now, after many test in between, I have thought of it must my my lungs/bronchia. I still suffer from the gerd but even that is a bit better with the addition of some tums and minor changes to my diet/portions and eating times. we do have to think out of the box sometimes, just like I did with my card today. the norm do not always work I guess.
thanks to all who pray for my health. I am very grateful and I give the praise to the Lord.

Thursday, July 21, 2011

CHRISTMAS IN JULY DAY THREE

this is my wall art project for the home decor part of the 
CHRISTMAS IN JULY EVENT

(i am aware of the photos not showing up yesterday at the hostess blog
thanks for letting me know. i contacted gisella and she will take care of it asap).

this project is not an original idea of mine but similar
to something i saw on the web and twisted it a bit to make it my own.
--here we go--

........Wishing You........
Happy Holidays
......................................................

size: 7" x 8.5"

pretty, huh?

i used my cricut for all the cuts since my paper trimmer tends to disappoint me--- :(

(remember to click on the pics for zooming in)

i chose a green pattern paper for the background and glued to the base of a thick chipboard.

the first yellow strip is 7" x 1.5".
the holly paper is 7" x 7.75"

the mat for the title was cut at 3.8" x 1.3" using ashlyn's alphabet for this shape. it is image#27 using the icon creative feature.

all the rectangles strips are 3" x .75".
the green strip to the right measures 2" x 7" with its mat.

 the holly border and red snowflake are from K&CO and so are the rest of the chipboard embellishments, except the star brad.

this cute pocket holding the candy canes is from tags, bags, boxes and more
(image# 48)

a few more pics of the overall project below.


Supplies:

Cricut Cartridges
---Ashlyn's Alphabet: rectangle strips; title mats
---Tags, Bags, Boxes & More: pocket for the candy canes

Cloud 9 Designs for the patterned papers:
Seasonal Collection
K&Co:
holiday embellishments

American Crafts:
foam adhesive

Sentiments:
various clear stamps from different manufacturers

Clear Embossing:
Ultra Thick from Jo'Ann Craft Essentials
Additional supplies:
from my craftroom

 ENJOY!

i will be back on Saturday with another project for the
Christmas in July Event.
in the meantime they are lots of projects to delight yourself at

********************

Wednesday, April 27, 2011

GROW


hello to all

yesterday i was able to resume yard work again. i had these leaves from last year in corners of the yard and fence that needed to be picked up, so i worked on that. our yard is a pretty nice size and it does takes a while for me to keep up with it, especially with my conditions. i told my husband we should cement most of the back yard, what do you think, hehe. any other suggestions instead having grass and having to deal with weeds and bare spots? lol.

anyway, yesterday rained again so i do not want to go outside and get all muddy, :P so i am going to pick up the senior pictures and then run some errands instead. but, i made this sign the other day, thinking about mother day's and un-expected guests, ;p and i wanted to share it with you.

Grow
7" by 3.5"

i hope you have a great day and 
love you all!

thanks for stopping by my humble blog.
*-*

Thursday, February 10, 2011

MINI CANVAS


i had in my stash a few mini canvas i had purchased a while ago. i took my acrylic paints out of the drawer, my modge podge, some papers and a new set of my pink stamper clear stamp. with the clear stamp sentiments in mind i started playing with my supplies.

Vroom Vroom
on a mini canvas
 i can't remember where the images are from, sorry. i wasn't paying too much attention.

the heart is from some wooden pieces i received from a giveaway.


the brads were plain office brads i sanded and with my stazon brown ink distressed them.

Vroom Vroom is from one of the new releases from my pink stamper called 

Boy Crazy

kind of crazy but had fun with it. it was very therapeutic, :)

i attached some twine to the back to be hung on the wall of my little nephew's room.


----


tomorrow night we are having our monthly my pink stamper blog hop called 
my pinkalicious blog hop


My Pinkalicious Blog Hop Friday
way cool!
9PM EST
we will be showcasing more of robyn's new stamp releases.
you can see more of them HERE.


thanks for stopping by even i have not been around much.
our families must always come first.
*_*
love you all

Tuesday, December 14, 2010

WELCOMING 2011


Hello my friends
*-*

The season is getting busier and busier and hardly anytime to craft. 
I had to make this project work for two blogs for lack of time. But, this is good in its own way.
Nilda from The Cuttlebug Spot and Sassy from She's a Sassy Lady will have to share the stage today...wink-wink

Because one of my RESOLUTIONS for the New Year is trying to be more FRUGAL...hehe  I am going to start re-purposing what ever I can just because.

The above frame I bought it 5-6 years ago at the Dollar Store. I bought a green one and a blue one. They measure 5 x 5, kind of a shadow box with a plastic flower inside, but like most things from the dollar store, the glue came apart on this one. I took them both down when my husband re-did the half bath in the fr. I never got rid of the frames because I really liked them and thought to fix it but never did :0 until yesterday morning when I had to make a project for Nildas Cutllebug Spot and Sheila's at Sassy Lady. ha! talk about last minute.... hehehe 

Happy 2011
it will be a gift with a name already :)
Did you realized that the first date next year will be
1-11-11
:p
I did not use the glass part but the frame only.


The cardstock used for the whole project is DCWV embossed with the cuttlebug using a Tim Holtz embossing folder called Patchwork. I am loving these Holtz' folders. They are really neat and the embossing comes out perfect.


The "happy 2011" were cut using A Child Year's font
and the embellishments are from a K&Co chipboard set.


The alpha's are metal brads from J's brand. I purchased them what it seems years and years ago, lol. I cut off the prongs and adhered them with my glue gun. They spell the last name of the recipient.


This is the side view.

I hope you enjoy it!
It is so very cute.

I am not sure if Nilda has a sponsor for this week or not (we are not told all the details) but even if she just has the challenge, hop over and play along and enjoy the work of my colleagues. I bet they are awesome as always.

Please, do not forget the Blog Hop for The Lime Light
this Friday December 17. Please, try your best to hop along. I know there will be lots of prizes and myself is finally giving away the Cricut Cartridge I mention a few months ago. I guessed I was waiting for the right time and that time has come.

Love you all!
and keep sane during the holidays, lol.

Saturday, July 24, 2010

IT'S NOT EASY BEING PINK BLOG HOP!

Hello everyone!

Welcome to the Blog Hop in which we are sending out a big
THANK YOU
to
Robyn, My Pink Stamper 
for allowing us the privilege and honor of being part of her design team for the first term. We also would love to thank her for her creativity and sharing her talent with us. She is an amazing person who is always doing things for others, so we wanted to do something special, just for her! If you are starting here, this is a Blog Hop that includes 7 bloggers total, which consists of the previous My Pink Stamper Design Team (Emma is still a current designer). Our theme is "Thank You" so you will see that throughout each blog as you hop along. You will defiantly want to check out everyone's project and, each blog has a fun giveaway to offer!! This is going to be so much fun, so let's get started!!!

This is my project forRobyn
A Note/Card Holder
I took two 12 by 12 pieces of chipboard and adhered them together with Scor-Pal double sided tape. I used the Rock Star collection from DCWV to cover the front (I left the back side raw :)) and I took another 12 by 12 chipboard and cut it at 4 inches and 8 inches for a total of three 4 inches pieces and covered them with more DCWV and another piece of cardstock from an unknown stash of mine :).  I added ribbons I purchased at Target and added those to the top of the 4 inches pieces with a glue gun. I then adhered those pieces to the front to make pockets for notes, cards, reminders etc. The fibers are from EK and the silver color chain from a ACM. The heart with the sentiment from a jewelry department. The buttons, gems, silver hem are from supplies I have collected.
The crown is from Once Upon a Princess, image #45 using shift and the phrase feature. I cut it at 2.94" using my Gypsy to weld the "R" from Blackletter and crown together and cut it out on chipboard. I then cut the same welded image again on the same DCWV cardstock. I also use "metal sheets" from Quickcutz to cut the "R" again to match the fabulous and the stars that were already on the cardstock.

Below is a  better view of the fibers which can be used to hang the holder on the wall if desired.

and on this one (below)
I am showing the card I submitted to be taken in consideration to be one of her designers. I am sending it to her for keeps.
I hope you enjoyed it and I hope to see it in on her scraproom wall one day :-)

Now, onto my
GIVEAWAY
for this Blog Hop
(USA SHIPPING ONLY---SO SORRY)
All I ask is for you to leave a comment on this post and a way to contact you in case you win. 
You will have 3 days to claim the prize.

Now, on to the next 6 talented ladies! The next person on the hop is Emma (click on her name to hop on over to her blog and join in on the fun)! If you started this blog hop over on one of the other amazing blogs, just click any of the names below and you will be re-directed to the next blog to hop along to!


Agnes (aka flowerdisco...U R HERE)


Thanks for stopping by and Happy Hopping!