Showing posts with label CRICUT DESIGN SPACE. Show all posts

Friday, September 18, 2015

SCHOOL DAYS MINI ALBUM


hello all,

i have to say i always liked this type of mini. i like the different sizes and the sneak peek of the pages. very easy to make as we all know and you can embellish it any way you want for whatever occasion you need.
just add some pretty pattern paper, die cuts, stickers, pics and you are ready to show it off.

i made it for a nephew who just started kindergarten. my niece can add some pics and notes about that special day. if she needs more pages (sure she will), she will let me know (she will) :D
i just wanted to share it with you all in my today's 


the size is approx: 9" long x 2-3/4' tall not counting the inserts.


-the pretty school theme paper is from we are memory keepers-


-a few more pics-
 -some of the embellishments are stickers and others die cuts i made-
the mini pockets and inserts come with the svg file as you saw on the screenshot.

no need to say my niece and nephew loved it and i loved making it for them.

it turned out simply adorable!


this is the original file
designed by carina gardner


-and, below is a screenshot of how it looks on my virtual mat is prior to cut-
(as you might know i use the cricut explore and cricut design space for my die cutting including all my digi playground svg's.)
Note: when in design space, do not forget to attach the score lines to the images, in this case the mini album base.

hope you enjoyed it and if you have any questions, please do not hesitate to ask them.

 once again, 
thanks for taking the time to stop by.


Friday, September 4, 2015

A BACK TO SCHOOL OWL CARD TAG

hello all,

this is the owl i had in my picture collage in the "previous post" that i couldn't use on my last project. remember i used
the cricut explore PNC (print and cut) feature and an svg's from the digi playground.

Back to School Card Tag
4.25"
i will try my best to explain the "how to" since i had some emails asking about the process.


step #1
-insert your images to the cricut design space-

step #2
-hide the back to school background by closing the eyes on the layer section to the right-

Step #3
-add two circles, change colors if desired, position them to the back of images (owl and back to school) , click "attach all" located at the top of virtual mat or by right clicking your mouse or touchpad, then click on "flatten" (see top right of pic) and
you will see the printer icon next to the layers sections instead the scissors for cut.

step#4
-click go and you will see the markings on your virtual cutting mat indicating it's ready to print-
***make sure you do not exceed the printing area. if you do exceed the printing area, go back and resize to a smaller size, hit go and print. after printing you are ready to cut in the explore.
if you have any questions, please contact me and i will try my best to help you.

here are some more pics of the card/tag:
-all the faux stitching was done with a white gel pen-


-the embellishment was made using a paper punch and a g studio clear stamp-

-the inside-

-cute little owl-
you also can cut the owl's layers individually or just some parts of it to add dimension and texture.

hope you enjoy my post for today.

see you next time,

blogged 
by
flowerdisco


Wednesday, September 2, 2015

A TRICK OR TREAT SCALLOPED PURSE TREAT HOLDER


for today's digi playground post i chose to make this cute scalloped purse and treat it as a trick or treat candy box. so easy to put together you do not even need glue because it has some nice tabs that you engage for the need of no glue at all, lol. 
cool, huh?

Trick or Treat 
(size around 5 inches in diameter and 2 inches in depth)
 the main ingredient here is the scalloped purse svg. it was designed by miss samantha walker and you can find it
here.
i know i keep saying this but it is really so easy to put together, it will be perfect for a get together kid parent project for halloween, school, birthdays, weddings and the possibilities are almost endless with these type of treat boxes.

anyway, i have to tell you the pretty cardstock is from an oldie dcwv stack. i do not know if you can find it anymore.
the tag is from a paper punch, the sentiment from a g studio clear stamp and the ink from prima.


this collage of pics i made to show some of the process and i know you are wondering about the "back to school" and "owl" pic. hehe.
well, i tell you that was what i had in mind.
i wanted to add them but i cut them too big. they will be saved for a round card tough because i love how they turned out.
i used my explore and design space to print and cut them and that is why i wanted to include them.
i wanted you to see you can print and cut too.
they are both svg files from the digi playground and i linked them for you if interested.

and...did you notice the tabs for a glueless project?
i think is such a nice feature.

this is it for today.
i thank you again for taking the time to visit and i hope you have a great week.
if you have any questions, please, do not hesitate to contact any of us.
we are here to help.

blogged
by
agnes
from
flowerdiscosscraphut

Tuesday, August 18, 2015

ELLA DRANK THE MILK

hello all,
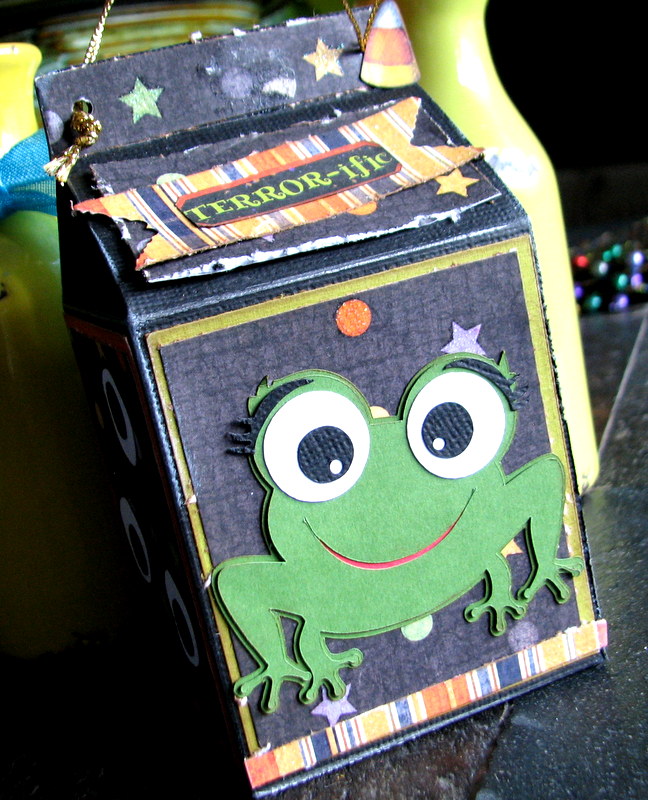
today i am sharing the cutest svg frog. i put her on the front of a milk carton.
i had made something similar in the past and since halloween is around the corner, can you believe it? so here it is.
anyhow,

here is 
i cut her around 2-1/2" wide and 2-1/4" tall.

look at those eyelashes. i am in love with them.
 i wish i had eyelashes like that. lol.

-this digi playground svg comes in different formats for different electronic die cutters but you do not even need a die cutter to make ella. she also comes in a printable format you can cut then with your scissors. yeap! isn't great?

the milk carton is from a cricut cart.
and the paper is an oldie fav of mine. i think is from my mind's eye.

the eyes are on two sides of the container.

and this is the top done with some scraps from my stash.

i think this is a cute project for your halloween party, if you celebrate halloween, that is. if not, the frog is cute enough for any paper crafting project.

Ella the Frog
 have fun with ella, the frog who drank the milk for halloween, lol
excuse the silliness, but i really love that frog.

see you next time...

oh...ella has been linked to the digiplayground store. just click on her pic or name.

thanks a bunch for stopping by!


Wednesday, August 5, 2015

CIRCUS ELEPHANTS...

fun?
hopefully no more. 

my post today started just as a crafty project but when i was starting to write, it  just hit me. it hit me hard.

and i started googling about circus elephants while thinking of cecil, the lion that was just killed in the name of fun. i felt really bad. so bad i was just thinking to start another project but no, i chose not to. 
instead, i will use this project as an eye opener. as an awareness. as an advocacy.

and, i will use my banner project to honor all animals, especially the ones suffering in captivity.

let me introduce you to 
-miss ellie or mr ellie-
whatever the gender might be.
at one time we really did not know better, but now we do, right?
right!

anyhow, these letters (font) are from a cricut cart called carousel. it is a beautiful cart.
lots of pretty images.
the embossing was done with a sizzix folder from tim holtz called: springtime backgrounds.
so pretty!

these blue circles were used to add dimension instead using pop dots.
(to tell you the truth i did this not because i have no pop dots but because i was too lazy to get up to get them, lol)

the beautiful pachyderm is an svg from the digi playground.
it was a pleasure to put together.
i did ink the edges for definition and also did some dry embossing on the body with an old fiskars texture plate i had in my stash.

the scalloped banner sections are also from the digi playground.

while googling about them i found out many circuses will be stopping the use of these animals.
 i was happy to read that, we are getting there.

well, and this is all for today.

i am hoping you enjoyed today's project, i really do.

take care and have a great day!


Thursday, July 30, 2015

SHAPE OF A PANDA

 i was finally able to set aside a bit of extra time for crafting.
-lazy days of summer, huh?-

i think you are going to love this panda. she is a digi file from the digi playground i made into a shaped card.


 measures around 5-1/2" 
super cute!


with some digital files i like to have a base that i can build upon. to do that i duplicate the image and then weld it to get my solid piece. remember i use cricut design space. it might be different with other cutting machines programs. 


after i cut all panda parts i layer them on my base and in some instances i add small pieces of cardstock to the back of them to add the dimension instead using pop dots.

see those freckles? 
one of those dots measures around 1/16" and the cricut explore did an awesome job cutting it perfectly.

the white textured cardstock is the thinner core-dinations cardstock and i use the cardstock setting on the dial.


this is the inside of the card. the font is from my computer (LD GLORIOUS?) using the cricut explore and a recollections brand signature especial medium point, crimson color marker. that was a mouthful, hehe.

let me know how you like it and if you have any questions, please let me know in the comments.

have a great weekend!


Wednesday, July 15, 2015

BUTTERFLY ON CANVAS

the inspiration for today's project comes from my own backyard.
 i have been planting perennials for 3-4 years now with birds and butterflies in mind 
and, i have plenty of birds. no problem with that. just yesterday i saw one i hadn't seen around. a kind of woodpecker called northern flicker. what a beautiful bird!
 but, i am failing attracting butterflies. this year we got a few more common butterflies showing up. i think that is a good thing, :) maybe i am not failing after all.

anyway,
the butterflies are what inspired my project and 
for today i am working with a new arrival to the store:

in this post i am also explaining how i download and save my digi playground files or any other files/images i want to save in my computer.
(a bit of pic heavy post) :D
hope it helps.

first,
My Butterfly on Canvas Project
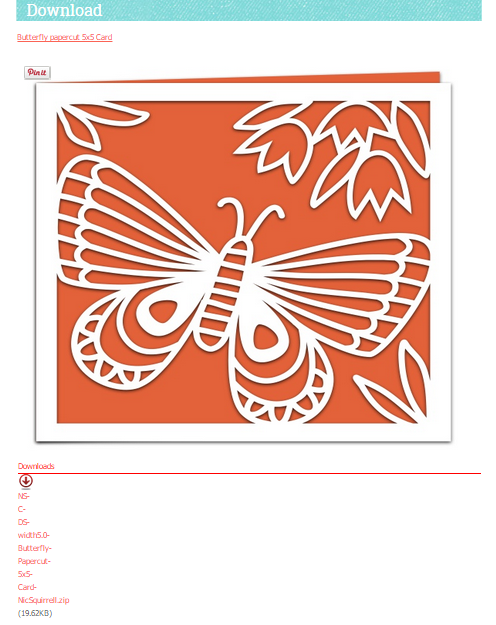
the file is for a 5 x 5 card but needless to say, i cut/sliced off the other side of the card and i kept just the butterfly part.

i used white textured cardstock for the butterfly outlines and 5 different color cardstocks for the inside: aqua, green, orange, pink and yellow.
i then used the negatives of the color cardstocks to paper piece? my butterfly.


i used the clear wink of stella to add the shimmery effect you see on the above pic.
(the background clouds paper is an oldie from dcwv)


-when done i adhered it to a mini canvas with my tape runner-
(5 x 5)
filed the edges and voila....
 "a butterfly on canvas".
hope you like it as much as i do.
it was a darling to make.


-this is nic's butterfly svg-
check it out, the pic is linked to the store.

and as always,
thanks for stopping by!

-----------------------------

now onto the tut of how i save my digital files.
remember you can click on any pics for a zoom in.
(know i have a pc not a mac, it might be/look different if you have a mac)


1- after purchasing or acquiring your file(s) you will be prompted to download:


normally, when you download images or copy and save images from the internet, it automatically defaults to a download folder in your computer. i recommend you find your default download folder prior to download just that you know where it is located (in case you do not know, that is). i also recommend adding a folder to your default download for your digital files and add a sub folder for each file you save. it makes your searches easier.


2- clicking on that red download button will take you to the page where your purchased image is:
you will see another red download button: click on it and it should automatically take you to your default download folder. (you should have added that other folder for your digis and maybe a sub folder if you wanted to---makes it all better). 


3-  if your download folder is not highlighted, you can click on it for your file to go in there and then click save. --your computer screen should look similar to the pic below. 

see that "extract files"?

click on it and that will open your files, ready to be used: (please, ignore my library, that is where i keep mine). 
the file(s) are now open (unzipped) and ready to upload to your electronic cutting program/software. 
i use cricut so i upload mine to cricut design space.

the one for cricut design space is the second one: see the DS for design space? (NS-C-DS). (i believe the first one is for any other software other than design space). some files have digital stamps, or pdf's you can print out and cut by hand. you can separate them in individual folders if you want to or just keep them all together in the same file folder. and that is that for the downloading and saving.
if i didn't explain it clearly, please, do not hesitate to contact me if you are using a pc (not mac) and i will be glad to help you step by step.
:D

----------------------

blogged by flowerdisco
from 


Tuesday, June 16, 2015

POPPIES, POPPIES AND MORE POPPIES

just sharing...

the poppy cut is sooo pretty!


the svg files can be found here.

-you can click on the pics for a close up-

i used the cricut explore along with cricut design space for the awesome intricate cuts.
i customized the setting and used the print paper one.

enjoy!


Friday, June 5, 2015

A SAILBOAT FOR MY DAD


i made another card for father's day because we are even closer to their special day and any other project would have been looked out of place, don't you think so too?

this one is from designer nic squirrell and it fits with all the rave for a nautical theme and of course for father's day.
if you miss the pegboard card from last week, you can still check it out here.

-this is my take on the sailboat-

Happy Father's Day
5" x 7" 
i did some dry embossing with my cuttlebug and an old fiskars embossing plate i have in my stash.
i embossed the yatch (sailboat) and the blue background cardstock.

the clouds are from some die cuts i normally have at hand and i believe they are from a cricut cartridge, so is the sun which i popped a bit.

i have been adding some wink of stella shimmer to some projects but is hard to see. in this case i added it to the sun, clouds and the happy father's day words.

a bit of a rustic twine for a bit of masculine touch.

i love when i open the card, the left side looks awesome: just like a silhouette.
(sorry about my geraniums but we are having rainy and cloudy days and i get better lightning sometimes in this front window facing west)

this super pretty Thank You word are from designer jamie cripps and i think it looks  adorable. the font is so pretty. 
the lines behind it are just some scraps from the front of the card. i think they look nice and they carry some of the design to the inside.

supplies used:
yatch card: digiplayground item# 19078
thank you word: digiplayground item# 19204

cardstock: recollections
embossing folders:  fiskars
embossing machine: cuttlebug

bling: wink of stella (clear)

die cutter: cricut explore
software: cricut design space

adhesive: martha stewart


hope you get you mojo going and you like this card as much as i did.

and once more, thank you so much for stopping by and if you like what you see, please share to any of your fav social media sites.


http://samanthawalkerct.blogspot.com/2015/06/a-yatch-for-my-dadfathers-day-card.html