Showing posts with label INKING TECHNIQUE. Show all posts

Wednesday, March 30, 2016

A CHICK'S HELLO!

Hello all!
Agnes here today happy to share another project I made using the so very beautiful Curious Metallic Cardstock from Cut Cardstock.
This time I am using botanic (green), the cognac (brown), the white gold and the mandarin (orange). These cardstock are 111# except white gold being a 92#.
I also used the 130# Classic Crest Recycled White, not from Curious Metallic, but I chose it because its thickness was perfect for my card base. The layers on this card needed some good support and therefor it came in very handy. I might use it for some mini albums and or tags in future projects.
My two favorite cardstock colors on this card ended up being the botanic and the white gold. More about them later on.

Below is a pic of Cricut Design Space virtual mat of some of the images used and a few+ words about my process making this cute card.

Sometimes I do not use all images I cut or follow the plan as you will see in a moment.

This time I ended up just using two of the chicks and some of the flowers but not those exact leaves. 
The chicks were cut using white gold which is like a frozen white kind of winter wonderland with a soft hint of gold....simply beautiful but, I wanted my chicks in yellow. I had seen Amber do something similar here, where she used ink to color her bunnies. I chose a dye ink for mine and I have to say I was a bit apprehensive I would take the fabulous glitz away but it was time to experiment and so I did with great results. The beauty of the white gold was accentuated even more. I love how it shines throughout and made my chicks stood out even more. 
I decided to ink some flowers too in pretty soft pink with the same results and then I decided to embossed the coppery cognac with a Cuttlebug folder. Again, with awesome results. This time the copper color in cognac shows magnificently on the embossing. 

 Know white gold is not the only exquisite color in this collection. Check these leaves out. Check the before and after shaping. Awesome. Botanic looks so velvety and soft and so pretty. Shame on me for not using those leaves but I am showing them anyway because they deserve it well. I love the orange too but as I previously stated, on this card I am more in love with botanic and white gold.

I achieved that dimension and texture by gently pressing and circling around them with a stylus, shaping as needed. 
I was almost done adhering all layers with trusty Tombo when I realized my chicks were almost eye-less, lol. I grabbed this Sakura pen and voila, my chicks were eye-less no more.
After changing a few things around and adding a drop of liquid pearls to the flowers centers and adding the tiny leaves instead the larger ones, I am finally able to show you the finished card.

I love the shimmer you can't see, but you have to believe me when I say it is stunning.
I hope you like the composition as well.
You could adapt this card for any other occasion or simply use it as an embellishment on a scrapbook page or re-size it to a bigger size and hang it on a wall or frame it if you want too. The possibilities are endless. Make it yours!

Well, time to go...thank you so much for your time.
                               Hope you enjoy today's post and smiled at least once.

                                                  Have a great Easter!

Cut Cardstock supplies used in this project:
Curious Metallic BotanicCurious Metallic Cognac Curious Metallic Mandarin


Neenah classic Crest Recycled 100 Bright White Mono Multi-Purpose Liquid GlueGloss Black

Warning: This Curious Metallic Cardstock will mesmerize you with its shimmer. It will be love at first sight.
You have to see it to believe it. (wink-wink) 
Please know these pics do not do justice to the real colors on this collection. 

Friday, December 11, 2015

I AM THANKFUL

so glad you are here. today's card is a super pretty one.
made with a variety of colorful inks and the thank you for everything stamp set from joy clair.


I AM THANKFUL
look at the color blocks and the awesome handwriting style font i like so much.
super cute!

the color blocks were done using a variety of inks: pigments and dyes and a background stamp from many years ago. wink-wink. 

i also used some thin dies for the faux stitching around the edges of the white and black cardstock just for a bit of accent to the frame.

a bit of rustic twine just because...and some pearls to cover a tiny boo-boo on the yellow line, lol.
i would have used the so popular sequins but i haven't purchased any yet. i keep forgetting.

i even did the inside. and after i thought it would have looked so pretty on the cover too.
the "for all you do" is also from the same stamp set: thank you for everything.

sooo, what do you think. between the handwritten style font and the colorful patches of rainbow...i do not know what i like more, hehe.

these are the stamp used along with its matching digital die.
Thank you card clear stamps  Thank You For Everything Digital Die
they have been linked for your convenience.

remember joy clair is having a dt call. 
check it out and good luck!

take care, have a great week and see you soon and as always...
thanks for your visit.

Wednesday, May 13, 2015

A HINGED GIFT CARD BOX

after a few days of having the slideshow tut on the digiplayground blog, i thought it was time to show some pics of the finished project here in my blog.

i am in love with this flower. 
i think it turned out awesome!


the hinged gift box is very unique and easy to cut and assemble.


-below a few more pics of the leaves and petals-
(you can click on pics to zoom in)


i used susan's garden tools from sizzix but any big ball stylus will help you to break up those paper fibers to manipulate the petals and leaves. 


you can still watch the tut here if you want.

thanks for stopping by and 
hope you all had a happy mother's day!
we ended up eating burgers from 5 guys, yummy!


Wednesday, June 25, 2014

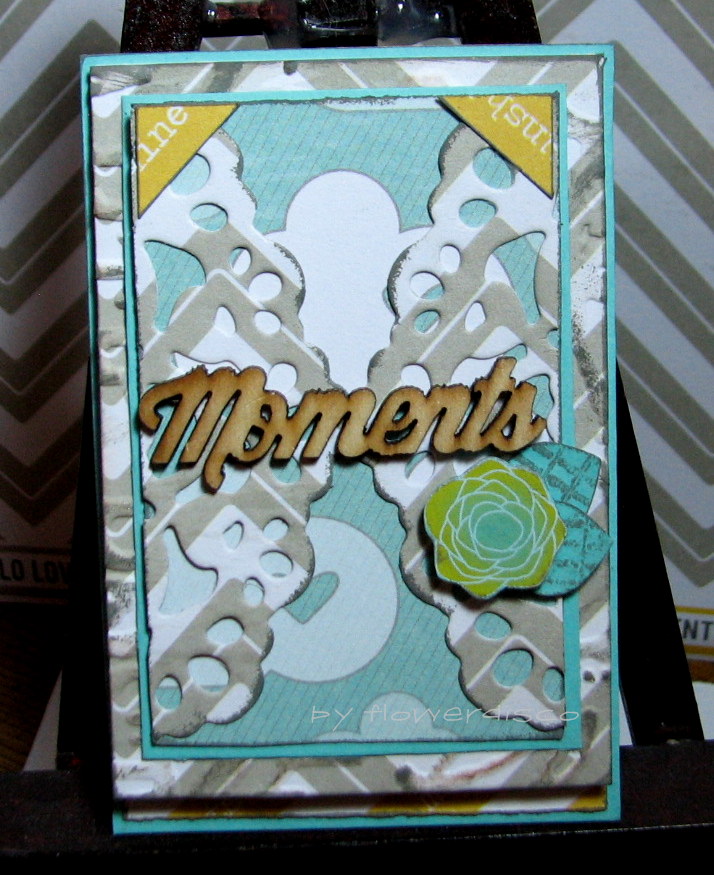
MOMENTS...a very pretty card

hello,
time went fast and i am  here again with another project for nani ke ola to share with you all.
have to tell you this small car was a handful, hehe, but here we are.
Moments
BY FLOWERDISCO FOR NKO USING CLOUD NINE FROM CHIC TAGS (3)
all pattern papers used are from
 can you see the embossing done on the first gray layer (from bottom to top)?
after the embossing i used a prima chalk ink on the raised surface and on the edges.
BY FLOWERDISCO FOR NKO USING CLOUD NINE FROM CHIC TAGS (2)
here you can see i used the same gray paper to die cut a doilie, i then cut it in half and added it to the front of my card. behind the doilie you can see another pretty patterned paper from cloud nine: the one with the clouds. it is called “dreamy”.
the wood veneer serves as a closure for the doilie and for the sentiment.
the pretty flower to the right is a rub on, also from cloud nine. i used foam tape on the back of the flower for dimension. the mini leaves are from a paper punch. i stamped some lines on them for interest.
let me not forget about the photo corners. they match with a strip i added to the inside.
BY FLOWERDISCO FOR NKO USING CLOUD NINE FROM CHIC TAGS (4)
on this pic above, you see how i mounted the card onto some cardstock, also for more interest.  you can also see where i added that strip of the same yellow patterned paper i used for the photo corners.
BY FLOWERDISCO FOR NKO USING CLOUD NINE FROM CHIC TAGS (1)
after all,  “miss handful moments” turned out very pretty. :D
i hope you all have a great week
and

Friday, May 23, 2014

A BOOKMARK FOR DAD

HELLO ALL
hope you are doing great.
i am doing fab....just had my son over for 2 entire weeks, yay!
we spent some priceless time together.
i am so happy.

anyway, since father's day is coming soon i made a bookmark for my husband since he does not like to read, lol....but he can use it at work for some paperwork...mmm, all is paper less anymore, hehe.
i guess i will end up using it myself.

i am calling the bookmark
Oh, Happy Day!
Dad
 i am sharing my project at nanikeola scrapbooking. it was my turn to play with the awesome cold country from 7 dots.
between nature walk and cold country i do not know which one i like better. both collections are beautiful...but then nanikeola have more from 7dots that i am also in love with. the pictures do not do them justice. when you have those papers in front of you...oh my!


on this bookmark i also used some of lindy's stamp gang sprays, some embossing powder, gesso and a  clear stamp set from illumination (another awesome collection from 7dots) . the orangey mini alphas are from messy head (heh, another fab 7dots collection. can you tell how much i like 7dots?) and those mini alphas are so very cute.  
the mini paper clip is from tim holtz. the stamped numbers are from my mind's eye.


 the heart and the tag where i stamped the sentiment are from nature walk. i added some purple dots with some kind of texture media i had in my stash for a while and i rubbed some of it on the edges too. 

 some machine stitching and rough edges of course, :D

well, and this is it for now. i hope you enjoyed my bookmark and i hope inspires you to play with some different media like i am just doing. i still love my die cuts but right now i am having fun getting stained, lol.

thanks for stopping by.

note the comments have been disabled due to spammers, but you can always pin it, facebook it or click on the reactions little boxes at the end of the post.

most supplies have been linked to nanikeola scrapbooking where you can see more of them.


Saturday, January 18, 2014

IMAGINE TODAY using Color Hills

hello fellow crafters,
hope you are having a great 2014 start.
all i want is some sunshine...enough of snow and ice and rain.
so my "imagine today" card with color hills brought some  of it (sunshine) into my crafty world.
this is my first time using color hills and i am liking the colors and thickness of the cardstock. the designs are superb and the badges (round embellishment) add some flair and are all that and more.
Imagine Today
is a 5.5" x 3.75" card
BY FLOWERDISCO FOR NANIKEOLA USING COLOR HILLS (3)
i told you it was like a ray of sunshine...beautiful paper! :D
BY FLOWERDISCO FOR NANIKEOLA USING COLOR HILLS (2)
the white base is from my stash. it was already a size 5.5" x 4.25"...a standard A2 size. i trimmed some of it to a 3.75" and used it as a tent style card.
the  designer patterned papers are from color hills:  the refresh collection and you can find it here.
BY FLOWERDISCO FOR NANIKEOLA USING COLOR HILLS (4)
i punched the bottom edge of the yellow patterned paper and use a die for the half doilie. the sentiment "imagine" was cut out right from the patterned paper, a simple rectangle.
all edges were inked with powder puff chalk inks.
BY FLOWERDISCO FOR NANIKEOLA USING COLOR HILLS (1)
some jute was added (three strings attached with mini staples) and some foam dot was added to the back of the badge (the badges have a pin to attach but i chose to use foam dots because of where i wanted to use them on my card), and a  bit of distressing on two areas...
and here you have it: an Imagine Today card with a bit of sunshine.
BY FLOWERDISCO FOR NANIKEOLA USING COLOR HILLS (5)
hope you enjoy my card for today using the new "refresh" collection from color hills.
all supplies have been linked for your convenience.
---thanks so much for stopping by---

Monday, August 26, 2013

THINKING OF YOU...

hello all,
"thinking of you" is the last card using my sweet august artful delight card kit.
as always it was packed with so many pretty papers, embellishments and a darling stamp set.

i can't wait to have the september one. i bet it will be as fabulous as the rest of them. the ladies who are in charge do a great job putting the kits together. i have love every single one and i have been able to work with different brands i normally do not find locally.

Thinking of You
4.25 x 5.5"
(i haven't make this size of card in a while-:)
for this card i used fancy pants patterned papers and chipboard stars. there is a thin strip of patterned paper that is from crate paper (the 4th one from the top).

 the tag is a die cut but it was just a bit short of what i wanted so i added a bit of the same crate paper i used for the thin strip and joined it with the supper pretty washi tape from queen & co. you will see it better in the pic below.
the green banners were stamped using two of the jillibean soup stamps and the "thinking of you" sentiment skinny banner is from pebbles.

on this pic you can see the strip that was added to the bottom of the tag with the washi tape.

  i know is a very busy card but all came together so well. i am so happy with the cluster of elements on the tag complimenting the pattern paper with the cameras, the stars and the film strip. we even see a little piece of heaven (first top strip of blue paper)...hehe.

hope you enjoy my card for today.

on another note, if you did not have time to join in our monthly challenge, mark it on your calendar for this coming month of september. the winner receives a kit of their choice: card or scrapbooking.


-thank you so much for stopping by the hut-

Wednesday, April 4, 2012

MISSING YOU...using tim holtz umbrella man

just to vary a bit from cricut, lol, i have made a cute card with the famous umbrella man sizzix die from tim holtz collection.

Missing You
3.5" x 5.5"
i used this green textured cardstock from the paper studio, very similar to dcwv and it cuts very nice with the cricut, in case you are wondering.
the yellow patterned paper is from crate---and yes! i am buying more paper, hehe
the tab is from a my mind's eye clear stamp and the sentiment from a g studio one. 

 cute scalloped borders are done with a fiskars punch and the ribbon i believe is from american crafts.
you know one of my weakness is the ink distressing. i just love the definition it gives to my projects besides the joyfulness i feel when i get in my grungy style....i just love inking. :D

below is the complete card and if you noticed, i added some rain drops on the green cardstock using the liquid embossing from all night media. i also added some pearls with some liquid pearls i had in my stash for a while.

-mr. umbrella man is missing you-

thanks for stopping by my scrap hut!


Wednesday, February 15, 2012

SWEET- a wall decor project

i do not know about you, but i am ready for spring. it does not matter that we hardly had any snow, or cold weather for that matter. i am skipping the gold from the irish for spring...lol.

 here i made a wall art decor. i already made some simple ones, but this one took me a bit longer. 
my inspiration was seeing my spring flowers already showing the green tops above the ground.
enjoy!

Sweet
3.5 by 7"
pretty, uh?
(wink)

i had/have these pieces of chipboard in my stash,  from albums i never altered---- they are like almost 1/4 of an inch thick and that is the base for my frame. 

this awesome tag is from k&co. i distressed it a bit with ink and added a bit if stickles to match the rest of the embellishments.

the sweet word is from paisley (cricut cart)---i wet embossed it with thick clear embossing powder and inked the edges too. i cut it four times, and glued the cuts together for dimension. after you have done this, they look like chipboard, and you get to use some of that cardstock in your stash before it rots, lol.

the square and circle are from the same k&co pack and the yellow pleated ribbon from recollections. the heart is from an old miss elizabeth product.

i made the holes with the pink crop-a-dile and added some eyelets and wire. the crop-a-dile is an awesome tool. it goes through everything--, including tin from pantry cans and new holes on your belt and sneakers if needed. ;p

this is the back. 
i added that strip of paper with re-enforcers to add sustainability.

here you can see the thickness of the chipboard.

and these, precious flowers below, are my own-- handmade.
i used ribbon, a needle with thread, made a few stitches until i gathered the 4 inches piece of ribbon and then glued it with my glue gun...ouch!!!. i got burned a few times. (i have to find a better way to make them)
 but----i LOVED the final product. you should try to make some.
 i also added a tear drop shape faux jewel to serve as a leaf. so cute!

any questions, please do not hesitate to ask...just shoot me an email or write on the comment area.

---thanks for stopping by---
your visits fuel my creativity and keep me crafting.
 thanks again!